

|
|
|
deegree iGeoPortal -
Standard Edition v2.2
|
lat/lon GmbH Aennchenstr. 19 53177 Bonn Germany Tel ++49 - 228 - 184 96-0 Fax ++49 - 228 - 184 96-29 info@lat-lon.de www.lat-lon.de |
Dept. of Geography Bonn University Meckenheimer Allee 166 53115 Bonn
Tel. ++49 228 732098 |
Change log
|
Date |
Description |
Author |
|---|---|---|
|
2006-10-19 |
Update using new formatting style |
Judit Mays |
|
2006-10-24 |
Add CSW client module. General clean up. |
Markus Müller |
|
2006-12-12 |
Move description of existing modules to new chapter. |
Judit Mays |
|
2007-01-04 |
Restructuring and Clean Up (typos, paths & files, links) |
Judit Mays |
|
2007-01-09 |
Harmonisation with standard deegree documentation structure |
Markus Müller |
|
2007-05-31 |
Updates for version 2.1 |
Hanko Rubach |
|
2008-02-01 |
LayerExtension Description updated |
Andreas Poth |
|
2008-02-14 |
Editorial changes regarding LayerExtension description |
Markus Lupp |
|
2008-03-03 |
Add description for CustomTabSwitch module |
Judit Mays |
|
2008-03-03 |
Add description for Dynamic Legend module |
Judit Mays |
|
2008-04-10 |
Add reference to PDFPrinting and FullScreen (Toolbar) |
Judit Mays |
|
2008-04-14 |
Add description for Digitizer module |
Judit Mays |
|
2008-04-15 |
Update to v2.2 |
Judit Mays |
|
|
|
|
Table of Contents
2.2 deegree iGeoPortal release 9
2.3 Testing the installation 9
3.1 Basic Structure of Map Context Files 11
3.2.1 Extension – IOSettings 13
3.2.3 Extension – MapParameter 17
4.1 MenuBarTop/MenuBarBottom 21
4.11.1 Setting up the WFS feature type 34
4.11.2 Adapting the digitizer module 34
4.13.1 Configuration of Web Map Context 35
4.13.2 Integration of the CSW-Client module 47
5.1 Manual Tomcat integration 51
5.1.1 Setting the path to application 51
5.2 XSL configuration files 53
6 Using RPC to start iGeoPortal 54
7.1 Modules without server component 56
7.2 Modules having a server component 61
7.2.1 The server component/listener 62
7.3 Conclusion - looking forward 71
Appendix A Simple example web map context document 73
Appendix B Web Map Context Document configured for CS-W Client module usage 88
Index of Tables
Table 1: Base files of the CSW Client module 43
Table 2: JavaScript-files for the CSW-Client module 44
Table 3: JSP-files for the CSW-Client module 44
Illustration Index
Figure 1: Welcome page of deegree iGeoPortal 9
Figure 2: initial page when starting deegree iGeoPortal 9
Figure 3: area definitions of iGeoPortal 14
Figure 4: mapcontext1 with BBoxInput1 module 56
deegree is a Java Framework offering the main building blocks for Spatial Data Infrastructures (SDIs). Its entire architecture is developed using standards of the Open Geospatial Consortium (OGC) and ISO Technical Committee 211 – Geographic information / Geoinformatics (ISO/TC 211). deegree encompasses OGC Web Services as well as clients. deegree is Free Software protected by the GNU Lesser General Public License (GNU LGPL) and is accessible at http://www.deegree.org.
deegree2 is the new release of deegree supporting a number of features that deegree1 was not able to handle. This documentation describes setup and configuration of the new deegree iGeoPortal standard edition, a client implementation of OGC's Web Map Service Implementation Specification 1.1.1 using OGC's Web Map Context documents for configuration.
deegree iGeoPortal is the web-based portal framework of deegree. It offers visualization of geodata through a standard web browser like Mozilla, Firefox or MSIE. The demo download that accompanies this document includes the standard functionality of iGeoPortal. This is basically a „Web-GIS“ using WMS servers as map source.
Additional modules not configured in this download package enable the user to search for and download data or digitize online and insert the result including its properties via transactional WFS into a database backend like Postgresql/Postgis, and navigate the displayed map using an OGC Gazetteer (WFS-G). Each user is able to store the current state of the portal in an OGC Web Map Context document that can be loaded again later to restore the portals state. If assigned to deegree users and a right management system (iGeoSecurity) the portal can limit this and other functions to authorized users and enable personalized configuration. A component for accessing OGC catalogue services for ISO 19115/19119 metadata is also under development.
The demo portal is preconfigured to work with a remote deegree2.2 demo Web Map Service (WMS), but there is no limitation on using other OGC WMS, for example UMN MapServer or other, (proprietary) servers that can be installed on remote machines. iGeoPortal is not limited to be used with just one WMS. You can combine several WMSs in one predefined context as well as load additional WMSs 'on the fly'. Additionally a simple search module based on a deegree2.2 demo WFS-G (Web Feature Service – Gazetteer enabled) is implemented.
To get an overview about deegree WMS and other deegree components that may be used within the context of iGeoPortal please have a look at the respective documentation. This document will deal only with the administration of iGeoPortal.
Besides iGeoPortal, deegree comprises a number of additional services and clients. A complete list of deegree components can be found at:
http://www.lat-lon.de → Products
Downloads of packaged deegree components can be found at:
http://www.deegree.org → Download
The web services of deegree are realized as Java modules controlled by one central servlet (the “dispatcher”). This servlet has to be deployed to the respective web server/servlet engine. Most of the common web servers support servlet technology, thus making deegree a universal product. The Apache-Tomcat 5.5 Servlet-Engine is recommended due to its widespread use and its status as an open-source product.
For deegree2 iGeoPortal to run you need:
Java (JRE or JSDK) version 1.5.x
Tomcat 5.5.x
For installation of these components refer to the corresponding documentation at java.sun.com and tomcat.apache.org.
deegree iGeoPortal can be downloaded from
http://www.deegree.org. The
release is packed as a WAR-archive (igeoportal-std.war). Simply put
this file into your $TOMCAT_HOME$/webapps directory and
(re-)start Tomcat. The installation of iGeoPortal is already done
with this, as long as you run tomcat on port 8080 and it is
accessible via 'localhost'. The package comes preconfigured with a
remote deegree2.2 demo WMS, why there is no further configuration
needed to get it up an running.
Note: It is also possible
to extract the WAR archive (which is nothing but a renamed .zip file)
into another place of your computer and direct Tomcat to this place.
Because of this possibility, in the remainder of this document, the
directory you extracted the files to is referred to as
$iGeoPortal_home$ (=$TOMCAT_HOME$/webapps/igeoportal-std
in the standard case).
The example uses a deegree WMS but this is not required. Each WMS compliant to OGC WMS 1.1.0 – 1.1.1 specifications can be used as well.
After deploying the application to tomcat, the portal can be started by entering:
http://localhost[:port]/igeoportal-std
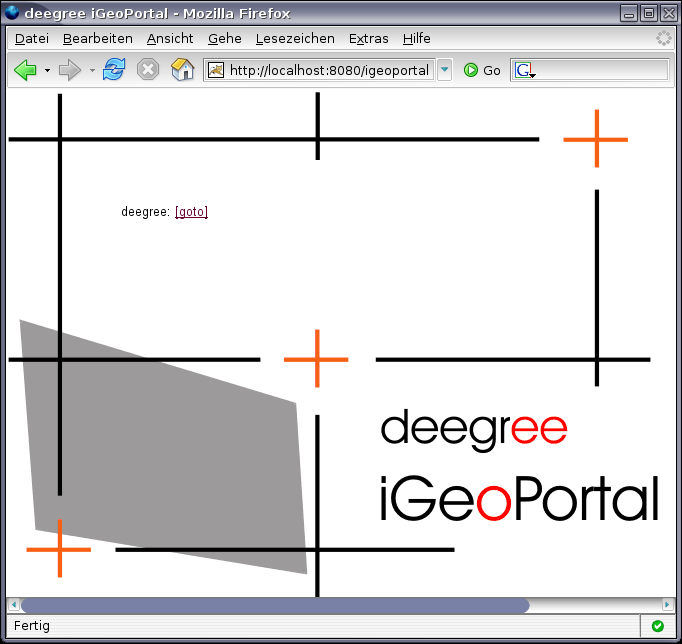
Figure
1: Welcome page of deegree iGeoPortal
into the address bar of your browser (this
usually is http://localhost/igeoportal-std or
http://localhost:8080/igeoportal-std). Doing this should
open the entry page.
Clicking the link [goto] nested in the page will lead you to the iGeoPortal itself. If everything went fine you should then see the following page (start context configuration wmc_start_utah.xml):
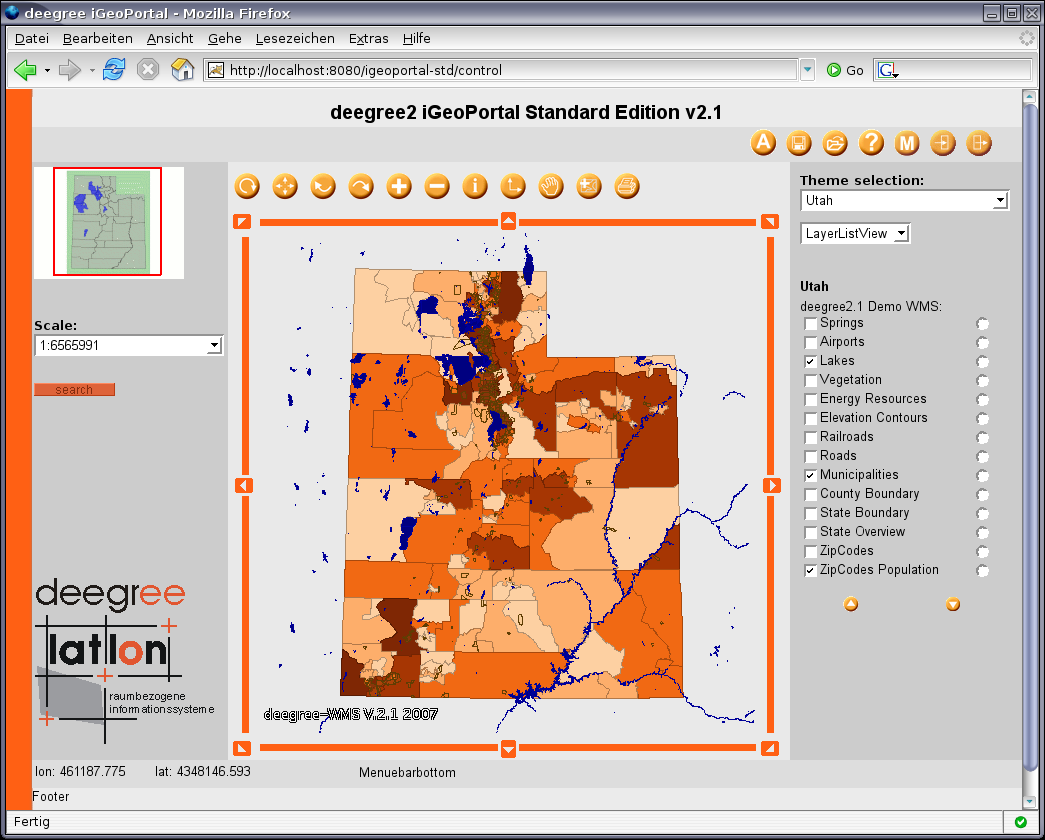
Figure
2: initial page when starting deegree iGeoPortal
Congratulations – you now have iGeoPortal
running!
The central configuration files of deegree iGeoPortal are XML documents that are valid against the XML-schema defined in OGC's Web Map Context specification 1.0.0. This schema defines two sections that are allowed to contain any well formed XML fragments. These sections (extensions in WMC syntax) are used by iGeoPortal to define layout and additional data access methods. Nevertheless a deegree iGeoPortal context document is a compliant WMC document and iGeoPortal is able to read and use WMC documents from other vendors.
As stated above, an OGC WMC document is divided
into several parts. Apart from the mandatory or optional parts of the
WMC specification it is possible to use elements called <Extension>
to define vendor specific elements/behaviors. The content of the the
<Extension> element is defined as <xs:any>
so the only restriction is that it has to be a well formed XML
fragment.
deegree iGeoPortal uses these elements mainly for definition of the graphical structure of the portal and definition of access paths to resources required by the portal. A detailed description of the content of all elements defined by the OGC can be found within the WMC specification that can be downloaded from the OGC pages (see https://portal.opengeospatial.org/files/?artifact_id=3841). Therefore only those elements will be explained in this documentation which are crucial for deegree iGeoPortal.
The root element of each map context configuration
file is <ViewContext>. It contains the required
namespace definitions and two child elements, <General>
and <LayerList>.
<?xml version="1.0" encoding="UTF-8"?>
<ViewContext xmlns="http://www.opengis.net/context"
xmlns:sld="http://www.opengis.net/sld" xmlns:xlink="http://www.w3.org/1999/xlink"
xmlns:xsi="http://www.w3.org/2001/XMLSchema-instance"
version="1.0.0" id="String">
<General>
...
<!-- described in chapter 3.2 -->
...
</General>
<LayerList>
...
<!-- described in chapter 3.3 -->
...
</LayerList>
</ViewContext>
The contents of these elements will be described in detail in the following paragraphs.
The element <General> contains
definitions of map size, map extent and of vendor and content
description. In detail these are:
size of the map window in pixel (<Window>),
geographic extent of the map including
coordinate reference system to be used (<BoundingBox>)
name of the map/portal context (<Title>),
optional list of keywords describing the
map/portal context (<KeywordList>),
optional description of the map/portal
context(<DescriptionURL>),
contact information (<ContactInformation>)
several extensions (<Extension>)
made by deegree that will be explained in the next few sections.
<General>
<!-- specifies the map size and must correspond to the module MapView definded further below. The <BoundingBox ...> sets the used CRS and the initial extend (used for button View full extent). BBox must have the same proportion as the <Window ...> settings. -->
<Window width="500" height="500" />
<BoundingBox SRS="EPSG:26912" minx="117300" miny="4049850" maxx="767300" maxy="4699850" />
<Title>deegree iGeoPortal</Title>
<KeywordList>
<Keyword>deegree</Keyword>
<Keyword>iGeoPortal</Keyword>
<Keyword>SDI</Keyword>
<Keyword>GDI</Keyword>
<Keyword>lat/lon</Keyword>
<Keyword>utah</Keyword>
</KeywordList>
<DescriptionURL format="text/html">
<OnlineResource xlink:type="simple" xlink:href="http://www.deegree.org" />
</DescriptionURL>
<ContactInformation>
<ContactPersonPrimary>
<ContactPerson>Andreas Poth</ContactPerson>
<ContactOrganization>lat/lon</ContactOrganization>
</ContactPersonPrimary>
<ContactPosition>developer</ContactPosition>
<ContactAddress>
<AddressType>postal</AddressType>
<Address>Aennchenstr. 19</Address>
<City>Bonn</City>
<StateOrProvince>NRW</StateOrProvince>
<PostCode>53177</PostCode>
<Country>Germany</Country>
</ContactAddress>
<ContactVoiceTelephone>++49 228 184960</ContactVoiceTelephone>
<ContactElectronicMailAddress>poth@lat-lon.de</ContactElectronicMailAddress>
</ContactInformation>
<Extension xmlns:deegree="http://www.deegree.org/context">
<deegree:IOSettings>
...
<!-- described in chapter 3.2.1 -->
...
</deegree:IOSettings>
<deegree:Frontend scope="JSP">
...
<!-- described in chapter 3.2.2 -->
...
</deegree:Frontend>
<deegree:MapParameter>
...
<!-- described in chapter 3.2.3 -->
...
</deegree:MapParameter>
</Extension>
</General>
The element <IOSettings>
describes some directories, where iGeoPortal stores files such as
print files. If you change the configuration of one of the demo
context files or define one of your own, you should keep in mind that
only the definition of <PrintDirectory> and
<TempDirectory> is mandatory. If some or all of
the other directory definitions are missing, deegree will use the
<TempDirectory> instead. Depending on the used
functionalities of a portal instance it may not be necessary to
publish all directories to the web. In this case a directory can be
located outside the web context or below the WEB-INF directory. To
access the directories content a web application must be defined in
<deegree:Access> instead of the path to the
directory.
The iGeoPortal demo uses the following reduced IOSettings. Because no modules for data download and user defined styles (SLD) are offered at the moment, corresponding directory definitions would not make sense.
<Extension xmlns:deegree="http://www.deegree.org/context">
<deegree:IOSettings>
<deegree:TempDirectory>
<deegree:Name>./../../../tmp</deegree:Name>
<deegree:Access>
<OnlineResource
xlink:type="simple"
xlink:href="http://localhost:8080/igeoportal-std?"/>
</deegree:Access>
</deegree:TempDirectory>
<deegree:PrintDirectory>
<deegree:Name>./../../../print</deegree:Name>
<deegree:Access>
<OnlineResource
xlink:type="simple"
xlink:href="http://localhost:8080/igeoportal-std/print?"/>
</deegree:Access>
</deegree:PrintDirectory>
<!--
<deegree:DownloadDirectory>
<deegree:Name>../../../print</deegree:Name>
<deegree:Access>
<OnlineResource
xlink:type="simple"
xlink:href="http://localhost:8080/igeoportal-std/"/>
</deegree:Access>
</deegree:DownloadDirectory>
<deegree:SLDDirectory>
<deegree:Name>../../../</deegree:Name>
<deegree:Access>
<OnlineResource
xlink:type="simple"
xlink:href="http://localhost:8080/igeoportal-std"/>
</deegree:Access>
</deegree:SLDDirectory>
-->
</deegree:IOSettings>
...
</Extension>
The element defined within the <Extension>
element associated to layout is the <Frontend>
element. It is used to define the graphical user interface, as well
as other system-specific parameters, not seen by the end-user. A
short overview is given here, the details will follow below.
<deegree:Frontend scope="JSP">
<deegree:Controller>...</deegree:Controller>
<deegree:Style>...</deegree:Style>
<deegree:Header>...</deegree:Header>
<deegree:Footer>...</deegree:Footer>
<deegree:CommonJS>...</deegree:CommonJS>
<deegree:North hidden="false">...</deegree:North>
<deegree:East hidden="false">...</deegree:East>
<deegree:West hidden="false">...</deegree:West>
<deegree:South hidden="false">...</deegree:South>
<deegree:Center hidden="false">...</deegree:Center>
</deegree:Frontend>
The idea of iGeoPortal is to encapsulate different functionalities in separate modules. These modules work as independent as possible from each other and they all use the same interface. So e.g. the map, its legend, or the layer list are all realized by separate modules. Each module can be located anywhere in the portals predefined layout frames. Except for map view and (the invisible) map model the registration of modules is optional. So it's your decision which functions to offer users of the map context instance (consider: each map context can define its own collection of available modules!).
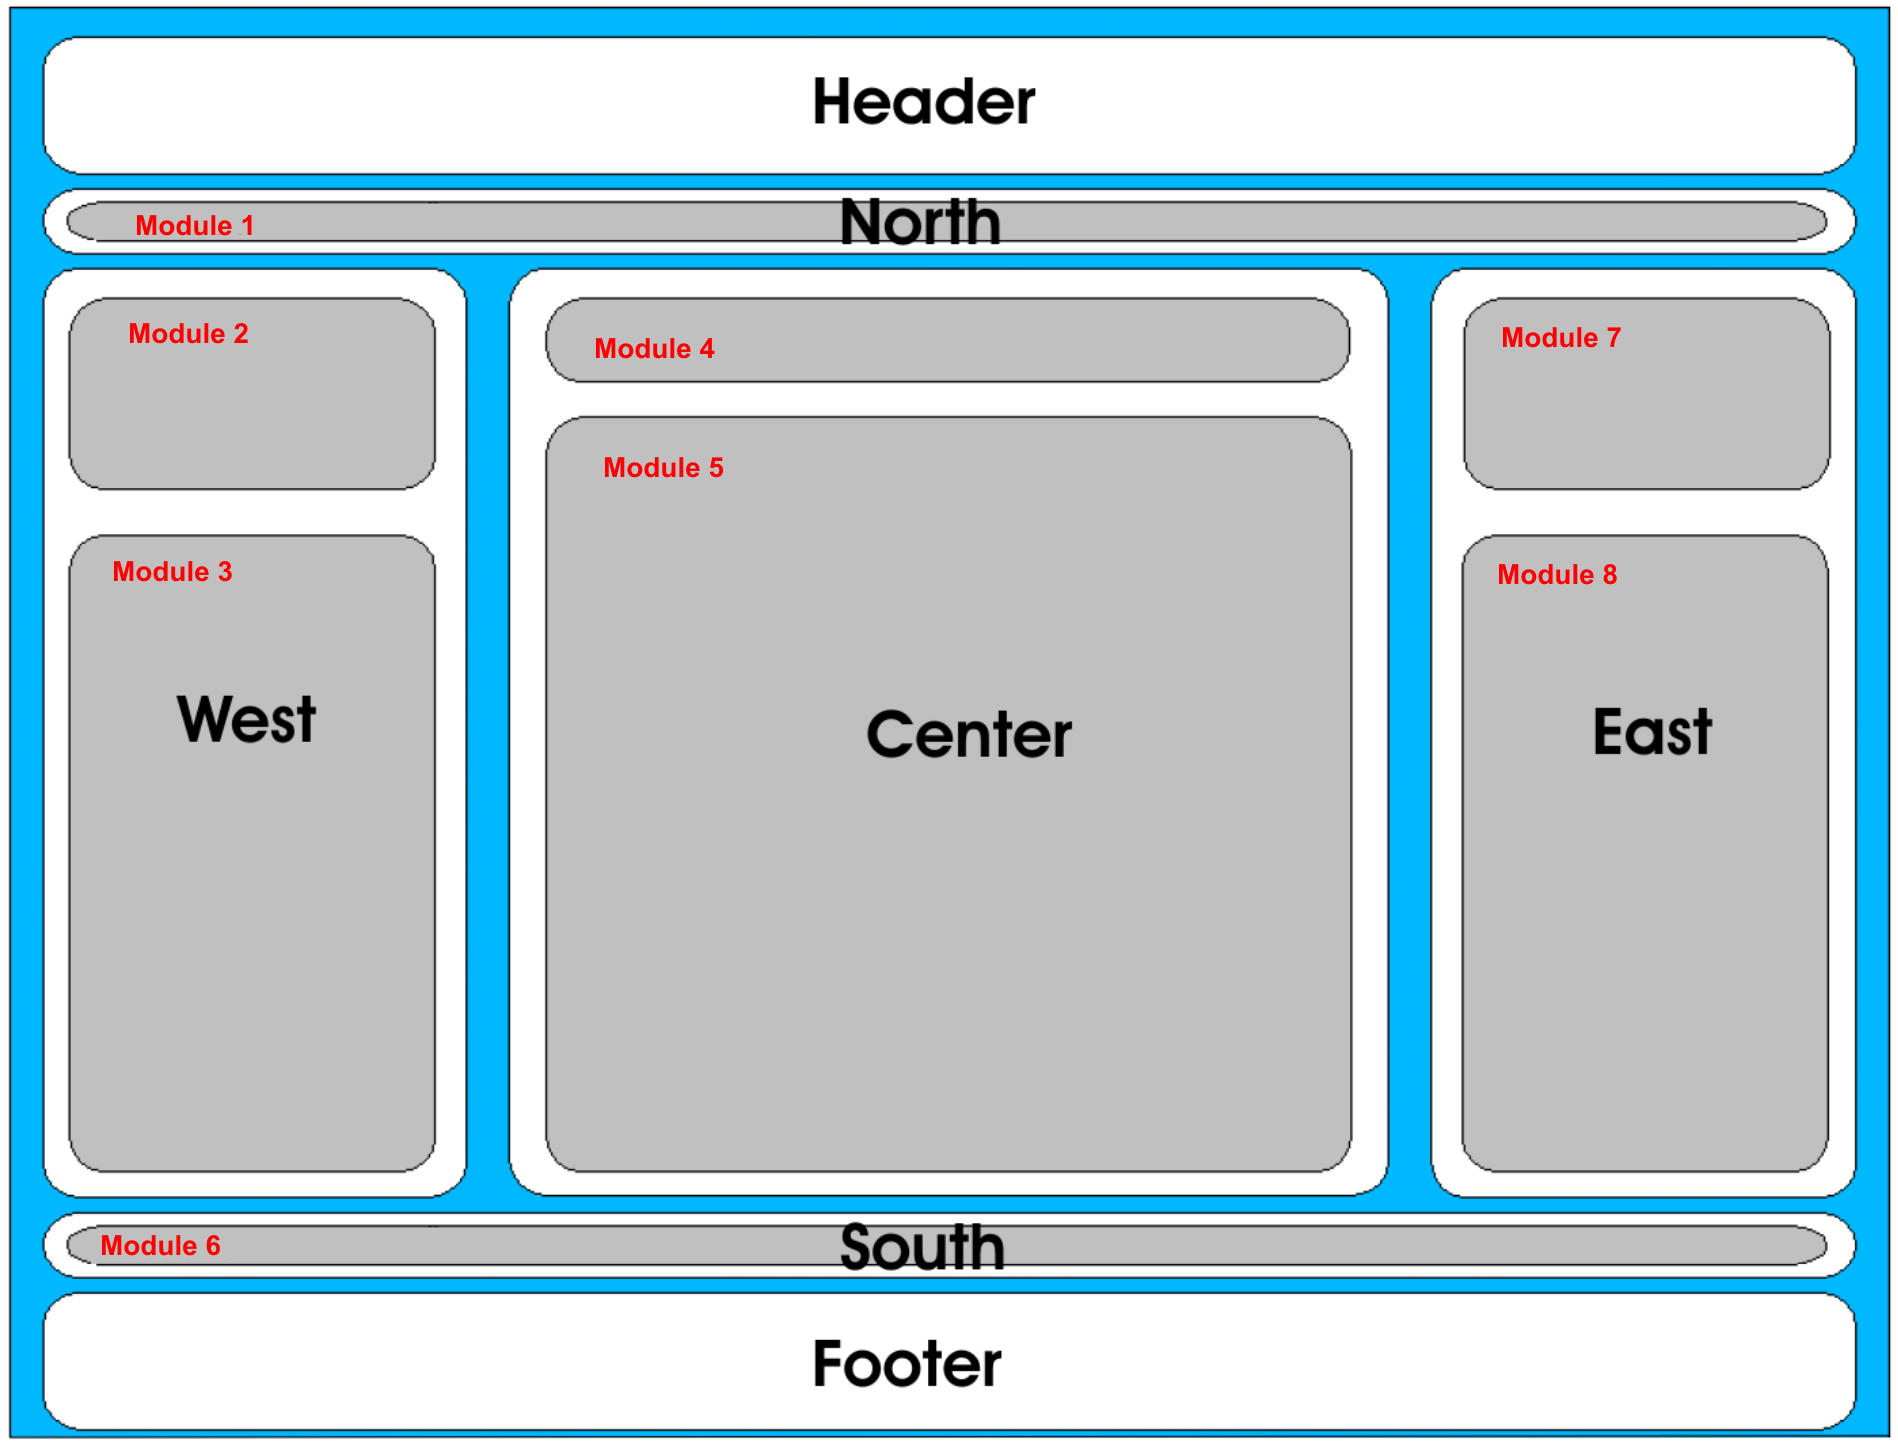
Figure
3: area definitions of iGeoPortal
Each module is made up of an HTML-Page and a
JavaScript object that can be included in the page or be located in
its own file. Instead of a static HTML-page any other resource that
is able to deliver HTML (e.g. JSP or ASP) can be used instead.
All modules are dynamically located on the portal's skin based on their settings. To enable the administrator of a portal to influence the portals layout deegree defines seven areas. A module can be assigned to five of these areas (North, East, South, West, Center); the other two areas (Header, Footer) are designed for taking links to simple HTML-content (static or dynamic). Usually they will be used for corporate identity, menus, external links etc.
The Controller will receive all portal driven events (zoomin, pan, print etc.) and delegates them to the responsible modules.
<deegree:Frontend scope="JSP">
<deegree:Controller>./modules/controller/controller.jsp</deegree:Controller>
<deegree:Style>./css/deegree.css</deegree:Style>
<deegree:Header>header.html</deegree:Header>
<deegree:Footer>footer.html</deegree:Footer>
<deegree:CommonJS>
<deegree:Name>event.js</deegree:Name>
<deegree:Name>envelope.js</deegree:Name>
<deegree:Name>geotransform.js</deegree:Name>
<deegree:Name>pushbutton.js</deegree:Name>
<deegree:Name>togglebutton.js</deegree:Name>
<deegree:Name>layergroup.js</deegree:Name>
<deegree:Name>htmllayer.js</deegree:Name>
<deegree:Name>layerutils.js</deegree:Name>
<deegree:Name>rpc.js</deegree:Name>
<deegree:Name>recentertolayer.js</deegree:Name>
</deegree:CommonJS>
...
</deegree:Frontend>
The
Controller definition is followed by setting the central stylesheet
document which controls the portals layout. Definitions made here can
be overwritten by CSS definitions made in an HTML-page assigned to a
loaded module. Behind this the optional content of the header and
footer section will be defined (notice: contents of header and footer
does not have to be a static HTML-page). Definition of 'common'
JavaScript files used by more than one module is optional too but it
strongly recommended. If a JavaScript or HTML file is defined without
absolute or relative path settings, the file must be located in
$iGeoPortal_home$
directory. Relative path settings use this directory as the starting
point.
After this the definition of the used areas (each area is allowed to be empty) and the modules contained in the areas follows. The following example demonstrates how the module 'MenuBarTop' is assigned to the 'North' area.
<deegree:North hidden="false">
<deegree:Module hidden="false" type="content" width="990" height="22"
scrolling="no">
<deegree:Name>MenuBarTop</deegree:Name>
<deegree:Content>menubartop.html</deegree:Content>
<deegree:ModuleJS>menubar.js</deegree:ModuleJS>
</deegree:Module>
</deegree:North>
Each area may include the optional attribute 'hidden' to define if an area should be visible when the context is loaded into the portal. This may be useful if an area's content just is intended to be visible in some situations (support for hidden-attribute is not completely implemented yet). Its default value is 'false'.
At the example above within the 'North' area the 'MenuBarTop' module is embedded. Even if the example shows just one module within an area there is no limit to the numbers of modules that can be registered to an area (if you register too many modules you may get a somehow strange portal layout). If more than one module is registered to an area deegree tries to arrange the modules considering their real size, preferred size (width, height attributes) and available space. Modules within 'North' and 'South' area will be arranged horizontally, modules within 'West', 'Center' and 'East' will be arranged vertically.
Five attributes can be assigned to each module registered to an area. But just one of them (the type) is mandatory:
hidden: defines whether a module should be visible when the context is loaded (default = false)
type: defines the type of the module, (content | toolbar); no default
width: preferred module width (may be modified by deegree)
height: preferred module height (may be modified by deegree)
scrolling: defines whether scrollbars should appear if a module exceeds available space (auto | no | yes; default = auto)
As sub-element of a <Module>
element its name (<Name>), resource of its content
(<Content>) and a JavaScript file will be set. The
last contains a JavaScript object having the identical name as the
module it is assigned to (this is mandatory, see below) (MenuBarTop
in the example above). If the content (e.g. a static HTML page)
already contains a JavaScript object with the same name as the module
<ModuleJS> can be left out.
For each module a parameter definition may be given. Each parameter (name/value) will be passed to the constructor of the JavaScript object assigned to a module. If a module receives more than one parameter the parameter definition must be in the same order the JavaScript object constructor expects it.
...
<deegree:Module hidden="false" type="content" height="70" width="180">
<deegree:Name>GazetteerSwitch</deegree:Name>
<deegree:Content>gazetteerswitch.html</deegree:Content>
<deegree:ModuleJS>gazetteerswitch.js</deegree:ModuleJS>
<deegree:ParameterList>
<deegree:Parameter>
<deegree:Name>targetIntFrame</deegree:Name>
<deegree:Value>'Street'</deegree:Value>
</deegree:Parameter>
<deegree:Parameter>
<deegree:Name>sourceModules</deegree:Name>
<deegree:Value>'Streets|gazetteerb.html;
descricts|gazetteera.html;'</deegree:Value>
</deegree:Parameter>
</deegree:ParameterList>
</deegree:Module>
...
All modules available for the demo of deegree iGeoPortal Std. Ed. are described in chapter 4.
Below the frontend description (list of available
modules) the parameters of deegree:MapParameters
describe the behaviour of the map in general. The
section defines the format of the GetFeatureInfo request, the factor
for zooming in or out, the factor for paning the map and the minimum
and maximum scale that is permitted for the map view in general.
<deegree:MapParameter>
<deegree:OfferedInfoFormats>
<deegree:Format>application/vnd.ogc.gml</deegree:Format>
<deegree:Format selected="true">text/html</deegree:Format>
</deegree:OfferedInfoFormats>
<deegree:OfferedZoomFactor>
<deegree:Factor selected="true">25</deegree:Factor>
</deegree:OfferedZoomFactor>
<deegree:OfferedPanFactor>
<deegree:Factor selected="true">15</deegree:Factor>
</deegree:OfferedPanFactor>
<deegree:MinScale>1</deegree:MinScale>
<deegree:MaxScale>100000</deegree:MaxScale>
</deegree:MapParameter>
Note: These values are currently not evaluated! Changing the values does not result in a changed behaviour of the portal. Hope for future releases.
After the general definition of the layout and the
registered functions of the portal follows the definition of the
available layers and their resources, according to OGC Web Map
Context (WMC) Specification. All WMC specific information is
encapsulated within the <LayerList> element. One
<LayerList> contains any amount of
<Layer>-elements. The sequence of the layers
describes the sequence of visible layers. Beneath all kinds of
elements of WMC specification, every layer is extended by the
<Extension>-element where you can define any other
characteristics. deegree iGeoPortal uses some extensions for
describing the data resources.
A <Layer>-Element has the
following syntax:
<Layer queryable="1" hidden="1">
<!-- service="OGC:WMS" version="1.1.1"principally iGeoportal is also capable of requesting WFS; this feaure is not usable yet. The title="deegree2.2 Demo WMS" must be unique for every requested WMS, in case you configure more than one WMS xlink:href specifies the online resource of the service -->
<Server service="OGC:WMS" version="1.1.1" title="deegree2.2 Demo WMS">
<OnlineResource xlink:type="simple"
xlink:href="http://demo.deegree.org/deegree-wms/services?" />
</Server>
<!--<Name> must the WMS name -->
<Name>Springs</Name>
<!-- Title can be chosen freely and should be human readable -->
<Title>Springs</Title>
<!-- Specifies the requested CRS to the WMS. Should be identical to the Web Map Context (WMC) configuration -->
<SRS>EPSG:26912</SRS>
<FormatList>
<!-- sets the requested image format. Must be offered by WMS -->
<Format current="1">image/png</Format>
</FormatList>
<StyleList>
<Style current="1">
<!-- set the style to be used. Must be offered by WMS -->
<Name>default</Name>
<Title>default</Title>
</Style>
</StyleList>
<Extension xmlns:deegree="http://www.deegree.org/context">
<deegree:ScaleHint min="0" max="1800000000"/>
</Extension>
</Layer>
Each element contains two attributes for
determining if a GetFeatureInfo-Request is possible queryable="1"
or if the layer is visible at start-up
hidden="1".
The first element <Server> describes which Web
Service delivers a specific layer. Via three attributes, its service
type, -version and -title are set. Theoretically, WFS and WCS
Services could be requested here. At the moment, neither the WMC
specification nor deegree implements them, so only OGC:WMS instances
can be referred to. The <Server>-element contains
the OnlineResource with the URL of a WMS and its according layer. The
title="WMS title" needs to be unique for every
implemented (WMS)- Service.
After defining the WMS, there are some definitions that are pretty similar to the ones of a Capabilities Document of a WMS. It is important to mention, that the statements are identical to the Capabilities or respectively subsets of them. For instance, the layer's name in the WMC document has to be identical to the WMS Capabilities document's layer name. The title can be different. The requested SRS for each layer of the portal has to be supported by the WMS. The same applies to the image format and style definition. Not all available formats, SRS and styles have to be defined.
deegree specific informations for <Layer>
are stored within an element named <Extension>.
For example deegree iGeoPortal stores informations for data access,
authentication mechanism and valid scale range of a layer here.
<Extension xmlns:deegree="http://www.deegree.org/context">
<deegree:DataService>
<Server service="OGC:WFS" version="1.1.1" title="deegree WFS">
<OnlineResource
xlink:type="simple"
xlink:href="http://127.0.0.1:8080/deegreewfs/wfs"/>
</Server>
<deegree:GeometryType>Polygon</deegree:GeometryType>
</deegree:DataService>
<deegree:ScaleHint min="0" max="1800000000"/>
<deegree:UseAuthentication>none</deegree:UseAuthentication>
</Extension>
Via the element <DataService>
the portal servers knows, where it can get the original vector data
for downloading.1
If no DataService for a layer is defined, downloads are not possible.
Additionally the scale range for visualizing a
layer can be defined. They correspond to the <ScaleHint>
information of the WMS Capabilities and are optional. If a
<ScaleHint> is defined and the current map view is
out of that scale range, the according layer in the layerlist is
greyed out. The <ScaleHint>, according to WMS
specification, is defined as ' the ground distance in metres of the
southwest to northeast diagonal of the middle pixel of the map.
To give deegree a hint if authentication information is to be used when accessing capabilities of a OWS the optional element <UseAuthentication> can be defined. The default value is 'none' which means that no authentication information will be used when accessing a OWS. To force authentication usage, either 'user/password' or 'sessionID' can be used. Using 'user/password' iGeoPortal adds the parameters USER and PASSWORD to requests against the OWS offering the requested layer; using sessionID a parameter named SESSIONID will be added.
When using 'user/password' or 'sessionID' you have to ensure, that:
a user's authentication is available for the client which loads a WMC
the OWS assigned with a layer is able to handle password authentication information
each layer within a WMC assigned to the same OWS must define the same value for <UseAuthentication> element.
There are numerous
modules available with iGeoPortal Standard Edition. In the demo
releases on line at http://demo.deegree.org the start web map context
is set to "Utah" (wmc_start_utah.xml), with
the possibility to switch to "Salt Lake City"
(wmc_saltlake.xml). From "Salt Lake City" you
can switch back to "Utah" or to a third web map context
called "Playground". These three contexts provide different
features of iGeoPortal Standard Edition. You will find most of the
newer modules in the "Playground" context
(wmc_testPlayground.xml).
Some features activated in the on line demo will not work out of the box for your downloaded and privately set up iGeoPortal. This holds true for those modules that need to be configured to your own requirements. You will find a comment in the description to these modules.
Description: menu bar containing links to functions of the portal and internal or external HTML-pages. Both modules are simple in their construction. It isn't a problem to extend or limit the pre-defined link list.
Init-parameters: none
Description: As described above the map
context document is the basis for functions and modules visible in an
iGeoPortal instance. The portal itself offers a 'container' where any
valid map context document can be processed and visualized.
ContextSwitcher represents a module that enables loading of other
contexts during runtime and switching content of a portal instance.
This enables offering different views or themes within one instance
of iGeoPortal. All context documents that should be available for
switching between must be stored in directory
$iGeoPortal_home$/WEB-INF/conf/igeoportal.
The module is realised as an HTML-page with a combo box that is filled by the assigned JavaScript object evaluating the passed init-parameters.
Init-parameters:
<deegree:Module hidden="false" type="content" width="150" height="50">
<deegree:Name>ContextSwitcher</deegree:Name>
<deegree:Content>contextswitcher.html</deegree:Content>
<deegree:ModuleJS>contextswitcher.js</deegree:ModuleJS>
<deegree:ParameterList>
<deegree:Parameter>
<deegree:Name>label</deegree:Name>
<deegree:Value>'Theme selection:'</deegree:Value>
</deegree:Parameter>
<deegree:Parameter>
<deegree:Name>listOfContexts</deegree:Name>
<!-- If you want to test digitizerModule, gazetteerClient, securityEnabledPortal, pdf printing or legend view switch to second <deegree:Value> entry.
-->
<deegree:Value>'Utah|wmc_start_utah.xml;Salt
Lake City|
wmc_saltlake.xml'</deegree:Value>
<!--
<deegree:Value>'Utah|wmc_start_utah.xml;Salt Lake City|
wmc_saltlake.xml;Playground|wmc_testPlayground.xml;
TestDynamicLegend|wmc_testDynLegend.xml;TestPdfPrint|
wmc_testPdfPrint.xml;TestCustomTab|wmc_testCustomTab.xml;
TestLegendView|wmc_testLegend.xml;TestFullScreen|
wmc_testFullScreen.xml;TestDigitizer|wmc_testDigitizer.xml;TestGaz|
wmc_testGazClient.xml;TestSecurity|
wmc_testSecurity.xml'</deegree:Value> -->
</deegree:Parameter>
<deegree:Parameter>
<deegree:Name>size</deegree:Name>
<deegree:Value>1</deegree:Value>
</deegree:Parameter>
<deegree:Parameter>
<deegree:Name>bgcolor</deegree:Name>
<deegree:Value>'#cccccc'</deegree:Value>
</deegree:Parameter>
</deegree:ParameterList>
</deegree:Module>
Four init-parameters are passed
to the module. By using the 'label' we can define the headline above
the combo box. Parameter 'listOfContexts' contains a comma separated
list of available context documents. Each list entry consists of two
parts. The first part is the context name as displayed in the combo
box. The second, separated by a '|' character, is the name of the
context document file as stored in
$iGeoPortal_home$/WEB-INF/conf/igeoportal
directory. The third init-parameter defines the size of the HTML
select element displaying the list of available contexts. A value of
'1' results in the display of a combo box. A value > 1 will force
displaying a HTML list. The last parameter enables definition of the
modules background color.
Description: deegree iGeoPortal arranges all modules assigned to an area considering their size, the preferred size and available space automatically. Especially if a large number of modules should be registered to a portal/context available space may be exceeded. For this case iGeoPortal offers the DefaultContentSwitch module. It represents a module that enables loading more than one module inside one portal area and switching its content during runtime. One can switch to the needed module through list boxes, menu items, tab panes or whatever a ContentSwitcher offers. The DefaultContentSwitcher available with the demo iGeoPortal uses a combo box for switching between layer list and legend view.
To enable switching between different modules these modules have to be registered first as described above within a portal area. The provider/administrator of a module must ensure that only one of these modules is set to visible (hidden='false') all others have to be invisible (hidden='true'). After this the DefaultContentSwitcher will be 'informed' through its init-parameters between which modules switching has to be enabled.
Init-parameters:
<deegree:ParameterList>
<deegree:Parameter>
<deegree:Name>targetFrame</deegree:Name>
<deegree:Value>'LayerListView'</deegree:Value>
</deegree:Parameter>
<deegree:Parameter>
<deegree:Name>sourceModules</deegree:Name>
<deegree:Value>
'LayerListView|layerlistview.html;Legend|legend.html'
</deegree:Value>
</deegree:Parameter>
</deegree:ParameterList>
The first parameter contains the name of the module that will be visible when loading the context. The second parameter contains a comma separated list of modules, between which switching will be possible. Each entry of the list contains two parts. The first part is the name of the module as displayed in the switchers combo box. The second is the name of content document assigned to a module.
Description: The CustomTabSwitch is a variation of the above DefaultContentSwitch. It also enables you to switch between layer list and legend view, but it uses tab panes instead of a combo box.
To test this functionality, please refer to the Web Map Context wmc_testCustomTab.xml.
Init-parameters: this module has the same init-parameters as the DefaultContentSwitch.
<deegree:Module hidden="false" type="content" height="25" width="175">
<deegree:Name>CustomTabSwitch</deegree:Name>
<deegree:Content>customtabswitch.html</deegree:Content>
<deegree:ModuleJS>customtabswitch.js</deegree:ModuleJS>
<deegree:ParameterList>
<deegree:Parameter>
<deegree:Name>targetFrame</deegree:Name>
<!--
value must correspond to first entry in
sourceModules value -->
<deegree:Value>'LayerListView'</deegree:Value>
</deegree:Parameter>
<deegree:Parameter>
<deegree:Name>sourceModules</deegree:Name>
<!--
order of entries in list is important. first entry
must be the visible module (targetFrame) -->
<deegree:Value>
'LayerListView|layerlistview.html;Legend|legend.html'
</deegree:Value>
</deegree:Parameter>
</deegree:ParameterList>
</deegree:Module>
The targetFrame contains the name of the module that will be visible when loading the context. The second parameter contains a comma separated list of modules, between which switching will be possible. The order of entries in this list is important. The first entry in the list must match the module that is chosen as initial module in targetFrame.
Description: The 'Legend' module is able to visualise the legend of the associated map. It calls the GetLegendGraphic-Function of an appropriate Web Map Service offering that optional function. The parameters used are mostly for controlling the layout.
Init Parameters:
<deegree:ParameterList>
<deegree:Parameter>
<deegree:Name>label</deegree:Name>
<deegree:Value>'Legend'</deegree:Value>
</deegree:Parameter>
<deegree:Parameter>
<deegree:Name>bgcolor</deegree:Name>
<deegree:Value>'#cccccc'</deegree:Value>
</deegree:Parameter>
<deegree:Parameter>
<deegree:Name>layerlist</deegree:Name>
<deegree:Value>this.layerList</deegree:Value>
</deegree:Parameter>
<deegree:Parameter>
<deegree:Name>width</deegree:Name>
<deegree:Value>20</deegree:Value>
</deegree:Parameter>
<deegree:Parameter>
<deegree:Name>height</deegree:Name>
<deegree:Value>20</deegree:Value>
</deegree:Parameter>
</deegree:ParameterList>
The parameter 'label' is for labeling the entire legend graphic; with 'bgcolor' the background color is defined. Initially the key 'layerlist' should not be changed; it is a reference to an internal list of map layers of the portal. It makes sense to change the key, if an instance of the portal contains more than one map in order to generate a separate legend for each map. With the parameter 'width' and 'height' you can define the size of the legend symbols (!), not the entire legend graphic itself.
Description: This module is a variation of the standard legend module. Instead of simply creating a GetLegendGraphic request and sending this request to the WMS of the respective layer, its functionality is more complex:
If a layer definition in the map contexts LayerList (see chapter 3.3) provides a layer name, and a style definition including the style name and a legend URL, then this URL is used to retrieve the legend image.
If no legend URL is set in the map context, then it is checked whether the WMS capabilities document contains a URL for this layer and style.
If no legend URL can be retrieved from the capabilities document, but the WMS can answer GetLegendGraphics requests, such a request will be sent and the response will be used to display the legend.
If the WMS does not provide GetLegendGraphics requests, or if no legend URL is available for the respective layer, no legend will be displayed. Instead, the image defined as 'missingLegend' (see below) will be shown.
Please refer to wmc_testDynLegend.xml for testing this module.
Init parameter in wmc:
The only parameter needed in the module configuration is the 'label' used for labeling the entire legend graphic.
<deegree:Module hidden="true" type="content" width="250" height="460">
<deegree:Name>Legend</deegree:Name>
<deegree:Content>legend_dyn.jsp</deegree:Content>
<deegree:ParameterList>
<deegree:Parameter>
<deegree:Name>label</deegree:Name>
<deegree:Value>'Legend'</deegree:Value>
</deegree:Parameter>
</deegree:ParameterList>
</deegree:Module>
Since this module carries out many more tasks than the simple Legend module (chapter 4.5), it needs to call the server side to generate the legend. It is therefore necessary to add an event handler to the controller.xml as described in chapter 7.2.
Init parameter in controller.xml:
The configuration parameters for the drawLegend event are described inline.
<event
name="mapClient:drawLegend"
class="org.deegree.portal.standard.wms.control.DynLegendListener"
next="legend_dyn.jsp"
alternativeNext="container.jsp">
<parameter>
<!-- left space to edge of legend -->
<name>leftMargin</name>
<value>0</value>
</parameter>
<parameter>
<!-- right space to edge of legend -->
<name>rightMargin</name>
<value>0</value>
</parameter>
<parameter>
<!-- top space to edge of legend -->
<name>topMargin</name>
<value>10</value>
</parameter>
<parameter>
<!-- bottom space to edge of legend -->
<name>bottomMargin</name>
<value>10</value>
</parameter>
<parameter>
<!-- printing the layer titles? true (yes) or false (no) -->
<name>useLayerTitle</name>
<value>true</value>
</parameter>
<parameter>
<!--
just for
GetLegendGraphicRequests:
if a legend is smaller
than eg. 50px the layer title will
be printed into
the legend image -->
<name>maxNNLegendSize</name>
<value>50</value>
</parameter>
<parameter>
<!--
separating the legend images from
each other
by an image -->
<name>separator</name>
<value>images/legendSeparator.gif</value>
</parameter>
<parameter>
<!-- image displayed if no legend can be found -->
<name>missingImage</name>
<value>images/missingLegend.gif</value>
</parameter>
<!--
for iGeoSecurity only: list of servers which need to be
accessed through an owsproxy to get a LegendGraphic -->
<parameter>
<name>users</name>
<!-- the value *must* be adjusted to your system -->
<value>
http://demo.deegree.org/deegree-wms/services;username;password|
http://deegree.org/owsproxy/proxy;username;password
</value>
</parameter>
</event>
The last parameter ('users') only needs to be set in GDI-environments using iGeoSecurity (see respective documentation for details). If only iGeoPortal is running, and no server is accessed via owsproxy, this parameter must be omitted.
If one or more servers need to be accessed through an owsproxy, the parameter 'users' needs to be set. The 'value' contains a list separated by | (pipe), where each entry consists of server-address;username;password. Username and password are the admin's login values for the respective owsproxy.
Description: The module 'LayerListView' is pretty similar to the 'Legend'-module. It describes also a list of the layers of a map but unlike the legend module it can be changed during runtime: layers can be shifted in their sequence and can be switched on or off. Besides, it is possible to define layers which can be queried by a GetFeatureInfo-request.
There are two implementations of 'LayerListView' available. The first (available through JavaScript file layerlistview.js) enables selecting one and only one layer for being target for GetFeatureInfo request (example context wmc_start_utah.xml). The other implementation (available through JavaScript file layerlistview_allfi.js) will always select all layers that are visible and queryable for GetFeatureInfo requests (example context wmc_saltlake.xml).
Init parameters:
<deegree:ParameterList>
<deegree:Parameter>
<deegree:Name>name</deegree:Name>
<deegree:Value>'layerlistview'</deegree:Value>
</deegree:Parameter>
<deegree:Parameter>
<deegree:Name>layerlist</deegree:Name>
<deegree:Value>this.layerList</deegree:Value>
</deegree:Parameter>
<deegree:Parameter>
<deegree:Name>label</deegree:Name>
<deegree:Value>'Wuppertal'</deegree:Value>
</deegree:Parameter>
<deegree:Parameter>
<deegree:Name>bgcolor</deegree:Name>
<deegree:Value>'#c1d3ed'</deegree:Value>
</deegree:Parameter>
<deegree:Parameter>
<deegree:Name>fgcolor</deegree:Name>
<deegree:Value>'#4D96DE'</deegree:Value>
</deegree:Parameter>
</deegree:ParameterList>
The name, given first, is used for clear identification of the module; 'layerlist', 'label' and 'bgcolor' are used identically as for the module 'legend' above. Since the list of layer is generated dynamically, the font color for the list has to be set.
Description: The 'MapOverview' module provides an overview map at a set display resolution for the area of the entire context. MapOverview can be provided by a map server dynamically or simply by a georeferenced map graphic. Besides a JavaScript-object having the same name as the module, another JavaScript file is required (wz_jsgraphics_box.js) that is used for painting the current box describing the current extent of visible map.
Init parameter:
<deegree:Module
hidden="false"
type="content"
width="150"
height="150"
scrolling="no">
<deegree:Name>MapOverview</deegree:Name>
<deegree:Content>mapoverview.html</deegree:Content>
<deegree:ModuleJS>mapoverview.js</deegree:ModuleJS>
<deegree:ModuleJS>wz_jsgraphics_box.js</deegree:ModuleJS>
<deegree:ParameterList>
<deegree:Parameter>
<deegree:Name>src</deegree:Name>
<deegree:Value>'./images/overview.gif'</deegree:Value>
</deegree:Parameter>
<deegree:Parameter>
<deegree:Name>minx</deegree:Name>
<deegree:Value>2570000</deegree:Value>
</deegree:Parameter>
<deegree:Parameter>
<deegree:Name>miny</deegree:Name>
<deegree:Value>5668000</deegree:Value>
</deegree:Parameter>
<deegree:Parameter>
<deegree:Name>maxx</deegree:Name>
<deegree:Value>2593000</deegree:Value>
</deegree:Parameter>
<deegree:Parameter>
<deegree:Name>maxy</deegree:Name>
<deegree:Value>5691000</deegree:Value>
</deegree:Parameter>
<deegree:Parameter>
<deegree:Name>foregroundColor</deegree:Name>
<deegree:Value>'#ff0000'</deegree:Value>
</deegree:Parameter>
<deegree:Parameter>
<deegree:Name>width</deegree:Name>
<deegree:Value>150</deegree:Value>
</deegree:Parameter>
<deegree:Parameter>
<deegree:Name>height</deegree:Name>
<deegree:Value>150</deegree:Value>
</deegree:Parameter>
</deegree:ParameterList>
</deegree:Module>
The parameter 'src' describes the source of the map overview presentation. A reference to a file as well as a GetMap-Request referring to a specific Web Map Service is permitted. The parameters 'minx', 'miny', 'maxx' and 'maxy' define the bounding box of the map overview. 'foregroundColor' controls the color of the painted box showing the extent of the actual mapview. 'width' and 'height' determine the size of the map overview in pixels.
Description: Above the map window is a tool bar for navigating the map in different ways: ZoomIn, ZoomOut, ZoomToLayer, go back to initial bounding box, recenter the map, drag the map. Also buttons for adding additional WMS to the portal and for creating a print pre-view are available. The amount, sequence and position of the visible buttons as well as their tool tips are controlled by the init parameters. Button parameter name
Init parameters:
<deegree:ParameterList>
<deegree:Parameter>
<deegree:Name>refresh|refresh map</deegree:Name>
<deegree:Value>PushButton</deegree:Value>
</deegree:Parameter>
<deegree:Parameter>
<deegree:Name>fullextent|zoom to full extent</deegree:Name>
<deegree:Value>PushButton</deegree:Value>
</deegree:Parameter>
<deegree:Parameter>
<deegree:Name>movetoprevious|move to previous map</deegree:Name>
<deegree:Value>PushButton</deegree:Value>
</deegree:Parameter>
<deegree:Parameter>
<deegree:Name>movetonext|next to previous map</deegree:Name>
<deegree:Value>PushButton</deegree:Value>
</deegree:Parameter>
<deegree:Parameter>
<deegree:Name>zoomin|zoomin by mouse click or mouse drag</deegree:Name>
<deegree:Value>ToggleButton</deegree:Value>
</deegree:Parameter>
<deegree:Parameter>
<deegree:Name>zoomout|zoomout by mouse click</deegree:Name>
<deegree:Value>ToggleButton</deegree:Value>
</deegree:Parameter>
<deegree:Parameter>
<deegree:Name>zoom2layer|zoomtolayer by mouse click</deegree:Name>
<deegree:Value>PushButton</deegree:Value>
</deegree:Parameter>
<deegree:Parameter>
<deegree:Name>
featureinfo|get info to a object within the map
</deegree:Name>
<deegree:Value>ToggleButton</deegree:Value>
</deegree:Parameter>
<deegree:Parameter>
<deegree:Name>recenter|recenter the map by mouse click</deegree:Name>
<deegree:Value>ToggleButton</deegree:Value>
</deegree:Parameter>
<deegree:Parameter>
<deegree:Name>
move|drag the map by mouse with pressed mouse button
</deegree:Name>
<deegree:Value>ToggleButton</deegree:Value>
</deegree:Parameter>
<deegree:Name>addwms|add additonal WMS to the map</deegree:Name>
<deegree:Value>PushButton</deegree:Value>
</deegree:Parameter>
<!-- for printing choose EITHER "plain print" OR "pdf print" method -->
<!-- PLAIN PRINT -->
<deegree:Parameter>
<deegree:Name>print|generate print view</deegree:Name>
<deegree:Value>PushButton</deegree:Value>
</deegree:Parameter>
<!-- PDF PRINT -->
<deegree:Parameter>
<deegree:Name>pdfprint|generate pdf</deegree:Name>
<deegree:Value>PushButton</deegree:Value>
</deegree:Parameter>
<!-- please delete the printing method that is not used -->
<deegree:Parameter>
<deegree:Name>selected</deegree:Name>
<deegree:Value>zoomin</deegree:Value>
</deegree:Parameter>
<deegree:Parameter>
<deegree:Name>bgcolor</deegree:Name>
<deegree:Value>'#e0e9f9'</deegree:Value>
</deegree:Parameter>
</deegree:ParameterList>
Apart from the last two parameters – one controls the tool that is activated after initialising the portal (selected); the other one defines the background color of the tool bar – all others are defining a whole set of useful buttons. There are two kinds of buttons: 'PushButton' and 'ToggleButton'. The first returns to its initial condition after being pressed (similar to the Ok-button in a dialog); 'ToggleButton' stays switched on (or off) after clicking and activates a certain tool.
ToggleButtons are 'ZoomIn', 'ZoomOut', 'featureinfo' and 'recenter'; and PushButtons are 'refresh', 'home', 'fullextent', 'zoom2layer', 'addwms', 'download' and 'print'.
All init parameters, linked to an action/button, have a name consisting of two elements which are divided by '|'. The first one describes the name of the function for the according button. Currently deegree iGeoPortal comprises the following functions:
refresh: Refresh Map if content has changed
fullextent: Zoom to full extend
home: Go to initial state of a map context
movetoprevious: move to previous map
movetonext: move to next map
zoomIn
zoomOut
zoom2layer: zoom to the default bbox of the selected layer (4.9.1)
featureinfo: Query Feature by click
move: drag map by mouse click
recenter: Recenter Map to click point
addwms: Add other Web Map Services (4.9.2)
print: Print current extent of Map (4.9.3)
pdfprint: Print current extent of Map using iReport (4.9.4)
fullScreen: Switch to a predefined version of the current context with reduced functionality but a much larger Map (4.9.5)
The functions zoom2layer, addWMS, print and pdfprint are configured using separate HTML-files described in the following sub-sections.
The layout of the buttons is defined by two
graphic files that have to fulfil the naming convention and have to
be placed in the appropriate directory $iGeoPortal_home$/images:
$componentname$.gif and
$componentname$_a.gif
Example:
zoomin.gif and zoomin_a.gif
addwms.gif and addwms_a.gif
The first file represents the button in inactivate state; the second in its activated one. The file names are case sensitive! In order to change the layout of the buttons, you just have to exchange these 2 graphic files.
The function zoom2Layer depends on the two files
recentertolayer.html and recentertolayer.js
in $iGeoPortal_home$ on the client side and the class
org.deegree.portal.standard.wms.control.RecenterToLayerListener
on the server side. In order to use this function a single layer has
to be selected from the layer list (by clicking the layer name).
The mechanism is as follows: if the selected layer has a LatLonBBox (WMS Capabilities), but no ScaleHint, then the zoom goes to LatLonBBox. If the layer has both LatLonBBox and ScaleHint, it is first checked, if the scale hint reduces the size of the bounding box. If so, the reduced bbox is taken for zoom in. Otherwise, the original LatLonBBox is used to zoom in.
Via mouse click on 'addWMS', a dialog is opened
for adding additional WMS instances: Either by typing the entire URL
or by selecting a preconfigured entry. A list of preconfigured WMS
instances can be predefined by the administrator in
$iGeoPortal_home$/addwms.html.
...
<td width="30"> </td>
<td width="90">known WMS: </td>
<td width="*">
<select id="knownwms" onchange="change()">
<option value="http://">select ...</option>
<option value="http://demo.deegree.org/deegree-wms/services">deegree demo WMS</option>
<option value="http://localhost:8080/deegree-wms/services">local deegree WMS</option>
</select>
</td>
...
By editing the select-block of the HTML document, the administrator is able to manipulate the preconfigured services.
By activating the print-button, the portal
generates a representation of the actual map extent in a higher
resolution to get high quality printings. By manipulating the
parameters in $iGeoPortal_home$/printviewopener.html,
the administrator can adapt size and quality of the printouts.
iGeoPortal communicates with the according server
components via Remote Procedure Calls (RPCs). They contain the name
of the function and potential parameters. In printviewopener.html
you can find the JavaScript-function 'getRPCValues()' that provides
the appropriate RPC for creating the print preview.
...
var s = "<?xml version='1.0' encoding='UTF-8'?><methodCall>" +
"<methodName>mapView:print</methodName><params>" +
"<param><value><struct>" +
"<member><name>paperFormat</name><value><string>A4</string></value></member>" +
"<member><name>resolution</name><value><string>150</string></value></member>" +
"<member><name>orientation</name><value><string>hoch</string></value></member>"+
"<member><name>format</name><value><string>jpeg</string></value></member>" +
"</struct></value></param>" +
...
The print preview is opened in a new window. Its
contents may be adapted by changing the file
$iGeoPortal_home$/printview.jsp. The map view is
displayed with a lower resolution on screen than what is used for
printing. The scaling might be adjusted by changing the style values
for img.map width.
<style type="text/css">
@media print {
img.map {
width: 600; /* might need to be adjusted */
}
}
</style>
Description: This new module will be described soon. Please refer to wmc_testPdfPrint.xml or wmc_testPlayground.xml for testing.
Description: This new module will be described soon. Please refer to wmc_testFullScreen.xml or wmc_testPlayground.xml for testing.
Description: The module 'MapView' contains the central map view of the portal. Attention: Some JavaScript files are linked to this module.
<deegree:ModuleJS>mapview.js</deegree:ModuleJS>
<deegree:ModuleJS>mapcontroller.js</deegree:ModuleJS>
<deegree:ModuleJS>mapmodel.js</deegree:ModuleJS>
<deegree:ModuleJS>wmsrequestfactory.js</deegree:ModuleJS>
<deegree:ModuleJS>wmslayer.js</deegree:ModuleJS>
The module is responsible for the representation of the map as well as for the acceptance of map oriented mouse events. GetMap-, GetFeatureInfo- and GetLegend- requests for the active layer are also created by this module.
Init parameter:
<deegree:ParameterList>
<deegree:Parameter>
<deegree:Name>model</deegree:Name>
<deegree:Value>this.mapModel</deegree:Value>
</deegree:Parameter>
<deegree:Parameter>
<deegree:Name>border</deegree:Name>
<deegree:Value>0</deegree:Value>
</deegree:Parameter>
</deegree:ParameterList>
Merely two parameters are transferred to the module: The first one associates a JavaScript-Object with the module describing the model of the map view (with layer, size, etc.). Basically, it is possible to manage more than one map, where each one is connected with a different map model. The second parameter 'border' could define the thickness of a border painted around the map, but currently this is not implemented yet.
With iGeoPortal you are not only able to visualize, navigate and evaluate spatial data, you are also able to digitize own data online and transfer it via WFS-T (e.g. deegree WFS) into a data backend like PostgreSQL/POSTGIS. The digitized data will even be validated to avoid corrupt data insert (e.g. self intersects of polygons will not be accepted; error massage when digitizing polygons in clockwise direction instead of counter clockwise direction, ...).
You
find a little appetizer map context with iGeoPortal demo. To see it
in action you can either switch to "Salt Lake City" and
then to the "Playground" context or you can edit the "Utah"
context (wmc_start_utah.xml)
in the module context switcher and comment out the element with only
2 contexts (default) and uncomment the one with the many test map
contexts. See chapter 4.2 for details.
Afterwards you can switch to either Playground
or TestDigitizer context and play around a bit.
In the on line demo, you can digitize a feature, do the WFS insert transaction and view the inserted feature in the map.
With your own installation from the deegree download pages the behaviour is different: by default, the WFS transaction will be aborted. If you would like to test the digitizing module completely, you need to (1) configure a WFS for the digitized features and (2) also adapt a few things in the digitizer module itself.
Description: This part will be described soon. Check the WFS documentation for general information on WFS installation and configuration.
Each map context containing the module configuration for digitizer module, needs to be adapted to your local needs. The WFS address needs to be set to your WFS instance. See the above chapter for details.
All other configuration parameters of the digitizer module will be explained in more detail, soon. Some short hints can be found in the module configuration of the web map contexts.
Furthermore, you need to activate sending the
insert-request to the WFS. The file
modules/digitizer/digitizer_window.jsp contains a function
sendRequest(), where a few changes need to be made. Just search for
"TODO", and follow the instructions.
You would probably also want to increase the zoom
factor of the digitizer map. Please search for "TODO"
in the file modules/digitizer/digitizermodule.js and, again, follow
the instructions.
Please note: as long as you don't have a properly configured WFS up and running, including the configuration of your feature type for digitizing, you will run into an error message when testing this module.
Another
available module is the gazetteer client module. It is integrated in
the web map context for playing around (wmc_testPlayground.xml)
as well as in the wmc_testGazClient.xml context. This
module is no out-of-the-box module. It needs special adjustments for
each group of feature types within a Gazetteer-WFS, depending on what
you wish to search for and how you like to display the results.
Therefore, each gazetteer client module is different.
A more detailed documentation for the integrated example will be available within this document soon.
Description: The CSW-Client module enables a user of iGeoPortal to send queries to an OGC-compliant Catalogue Service and to save the results in Web Map Context files. The module supports catalogues implementing the CS-W 2.0 ISO 19115/19119 Application profile in version 0.9.3. This module is “optional” in that it is not part of usual web map portals.
As this module implements some complex functionality its configuration is also more complex than for the average iGeoPortal module. First, the module has to be referred to, the layout of the portal has to be adjusted and finally the module itself has to be configured. All of these steps will be described in the following sections.
The iGeoPortal demo package includes a web map context configured for CS-W usage. When using this sample context it is only necessary to adjust the parameters defined in section 4.13.1. If you are interested in how the CSW-Client module can be integrated in an existing iGeoPortal instance, consider reading section 4.13.2.
The required .html, .jsp and .js files are located
at $iGeoPortal_home$/modules/csw.
XSLT-transformation scripts are located at $iGeoPortal
_home$/WEB-INF/conf/igeoportal/csw.
For
this demo of iGeoPortal v2.2 the CSW-client is not
out the box configured.
The parameter maxRecords defines how many hits of a query to a CSW-Service are processed. Using this parameter, the length of the resulting list of a query can be influenced.
<deegree:Parameter>
<!-- only this parameter is optional. default is 10. -->
<deegree:Name>maxRecords</deegree:Name>
<deegree:Value>10</deegree:Value>
</deegree:Parameter>
The parameter is optional. The default value is 10, which matches the default value of the corresponding OGC specification. If the parameter is omitted, the default value ist used. If a different value is provided, it will be used instead.
This is in fact a group of parameters using the same prefix (“Profiles.”). At least one parameter with this prefix is mandatory. Allowed suffixes are “ISO 19115” and “OGCCORE”, although only “ISO 19115” is currently supported by iGeoPortal.
<deegree:Parameter>
<deegree:Name>Profiles.ISO19115</deegree:Name>
<deegree:Value>
'brief|metaList2html.xsl;full|metaContent2html.xsl'
</deegree:Value>
</deegree:Parameter>
The value of the parameter includes a list of value pairs consisting of an identifier, a separation marker ( „|“ ) and the name of an XSL-transformation file.
The identifier refers to the ElementSetName parameter of a GetRecords request to a CS-W. Allowed values are „brief“, „summary“ and „full“, although „summary“ is not supported so far.
The identifier “brief” refers to
a transformation file (metaList2html.xsl)
that creates a list of results from a GetRecordsResponse. The
identifier “full” refers to a transformation file
(metaContent2html.xsl)
that transforms a full metadata record set from the results of a
complete query (GetRecordByIdResponse).
Details of the transformation files are described in sections 4.13.2.5 and 4.13.1.9.
The parameter “Catalogues” defines which CSW-instance should be queried by the iGeoPortal CSW-Client module. It is mandatory to provide at least one catalogue service.
<deegree:Parameter>
<deegree:Name>Catalogues</deegree:Name>
<deegree:Value>
'CATA1|http://localhost:8085/deegree/services;
TEST|http://localhost:8085/deegree/test/catalogue'
</deegree:Value>
</deegree:Parameter>
The parameter value includes a list of pairs of identifiers (name of the catalogue service) delimited by the corresponding URL using “|”.
This parameter defines with which protocol the catalogues can be accessed. Allowed values are “POST” and “SOAP”. If both values are provided for a catalogue, “SOAP” is used.
The parameter “Protocols” is mandatory, it must be declared in the configuration for each catalogue defined by the “Catalogues“-parameter (section 4.13.1.3).
<deegree:Parameter>
<deegree:Name>Protocols</deegree:Name>
<deegree:Value>'CATA1|POST;TEST|POST,SOAP'</deegree:Value>
</deegree:Parameter>
The parameter value contains a list of value pairs separated by semicolons. The value pairs consist of an identifier (name of the catalogue) followed by a delimiter (“|”) and a comma separated list of supported protocols.
The parameter “Formats” defines which catalogue understand and supports which format. Possible formats are „ISO 19115“, „ISO 19119“ and „OGCCORE“.
The parameter is mandatory, at least one format type must be provided for each catalogue defined by „Catalogues“ (section 4.13.1.3).
<deegree:Parameter>
<deegree:Name>Formats</deegree:Name>
<deegree:Value>'CATA1|ISO19115;TEST|ISO19119'</deegree:Value>
</deegree:Parameter>
The parameter value consists of a list of value-pairs separated by semicolons. The value pairs consist of an identifier (name of the catalogue) followed by a delimiter (“|”) and a comma separated list of possible formats.
The parameter “mapContextTemplate” defines
which file is used as template of user specific Web Map Context
documents. The file is located inside $iGeoPortal_home$
at the location defined by this parameter. This parameter is
mandatory.
<deegree:Parameter>
<deegree:Name>mapContextTemplate</deegree:Name>
<deegree:Value>
'WEB-INF/conf/igeoportal/users/mapContextTemplate.xml'
</deegree:Value>
</deegree:Parameter>
It is recommended to use a copy of an existing Web
Map Context file and deleting the content of its <LayerList>
element (see following example).
<?xml version="1.0" encoding="UTF-8"?>
<ViewContext
xmlns="http://www.opengis.net/context"
xmlns:sld="http://www.opengis.net/sld"
xmlns:xlink="http://www.w3.org/1999/xlink"
xmlns:xsi="http://www.w3.org/2001/XMLSchema-instance"
version="1.0.0"
id="String">
<General>
...
<!-- the same as always -->
...
</General>
<LayerList>
<!-- empty space for new user layers -->
</LayerList>
</ViewContext>
In case a user that is logged onto the system has (at least) one metadata set added to his shopping cart, he is allowed to save the list of layers and display it in the portal (if all chosen datasets are accessible via WMS). All of these datasets are added to the declared template and saved in the directory of the user.
The parameter „namespaceBindings“ is mandatory. It defines a list (semicolon separated) of all namespaces that are needed by the CSW client module.
<deegree:Parameter>
<deegree:Name>namespaceBindings</deegree:Name>
<deegree:Value>
'xmlns:csw=http://www.opengis.net/cat/csw;xmlns:iso19115=http://schemas.opengis.net/iso19115full;xmlns:iso19115brief=http://schemas.opengis.net/iso19115brief;xmlns:iso19119=http://schemas.opengis.net/iso19119;xmlns:smXML=http://metadata.dgiwg.org/smXML'
</deegree:Value>
</deegree:Parameter>
The list always
includes the definition of xmlns:csw, as well as the
namespaces of the used schemas ( ISO 19115 / OGCCORE ).
In this section a number of parameters are described that include a declaration of an XPath to a specific part of a csw:GetRecordResponse. These path expressions depend on the used schema (ISO 19115, ISO 19119, OGCCORE) and therefore it may be necessary to adjust them.
The path to be supplied is the end part of the metadata element.
<!--
The parameter value to be specified is represented by
[thisPartOnly]
in the following
line:
/csw:GetRecordsResponse/csw:SearchResults/[MetadataElement]/[thisPartOnly]
-->
For ISO 19115 this means that the path to the FileIdentifier does not need to be referenced by using
/csw:GetRecordsResponse/csw:SearchResults/smXML:MD_Metadata/iso19115brief:fileIdentifier/smXML:CharacterString
but that the beginning part can be omitted. Only iso19115brief:fileIdentifier/smXML:CharacterString has to be supplied.
This behavior applies to all XPathTo*** parameters.
Inside the XPath expressions, all usual
possibilities are allowed. An example can be seen for
XPathToServiceAddress.
The parameter XPathToDataId defines the path to the unique identifier of the data metadataset.
<deegree:Parameter>
<deegree:Name>XPathToDataId</deegree:Name>
<deegree:Value>
'iso19115brief:fileIdentifier/smXML:CharacterString'
</deegree:Value>
</deegree:Parameter>
The parameter XPathToDataTitle defines the path to the title of the data metadataset, if the query is executed using ElementSetName=“brief“.
<deegree:Parameter>
<deegree:Name>XPathToDataTitle</deegree:Name>
<deegree:Value>
'iso19115brief:identificationInfo/smXML:MD_DataIdentification/smXML:citation/smXML:CI_Citation/smXML:title/smXML:CharacterString'
</deegree:Value>
</deegree:Parameter>
The parameter XPathToDataTitleFull defines the path to the title of the data metadataset, if the query is executed using ElementSetName=“full“.
<deegree:Parameter>
<deegree:Name>XPathToDataTitleFull</deegree:Name>
<deegree:Value>
'iso19115:identificationInfo/smXML:MD_DataIdentification/smXML:citation/smXML:CI_Citation/smXML:title/smXML:CharacterString'
</deegree:Value>
</deegree:Parameter>
The parameter XPathToServiceId supplies the path to the unique identifier of the service metadataset.
<deegree:Parameter>
<deegree:Name>XPathToServiceId</deegree:Name>
<deegree:Value>
'smXML:fileIdentifier/smXML:CharacterString'
</deegree:Value>
</deegree:Parameter>
The parameter XPathToServiceTitle supplies the path to the title of the service, that allows access to the dataset.
<deegree:Parameter>
<deegree:Name>XPathToServiceTitle</deegree:Name>
<deegree:Value>
'smXML:identificationInfo/iso19119:CSW_ServiceIdentification/smXML:citation/smXML:CI_Citation/smXML:title/smXML:CharacterString'
</deegree:Value>
</deegree:Parameter>
The Parameter XPathToServiceOperatesOnTitle supplies the path to the title of the data metadataset, that the current dataset of the service metadata refers to.
<deegree:Parameter>
<deegree:Name>XPathToServiceOperatesOnTitle</deegree:Name>
<deegree:Value>
'smXML:identificationInfo/iso19119:CSW_ServiceIdentification/iso19119:operatesOn/smXML:MD_DataIdentification/smXML:citation/smXML:CI_Citation/smXML:title/smXML:CharacterString'
</deegree:Value>
</deegree:Parameter>
The parameter XPathToServiceAddress supplies the path to the service address at which the Capabilities of the service can be queried, that supplies the title, which is read from XpathToServiceOperatesOnTitle.
<deegree:Parameter>
<deegree:Name>XPathToServiceAddress</deegree:Name>
<deegree:Value>
'smXML:identificationInfo/iso19119:CSW_ServiceIdentification/iso19119:operationMetadata[iso19119:SV_OperationMetadata/iso19119:operationName/smXML:CharacterString="GetCapabilities"]/iso19119:SV_OperationMetadata/iso19119:connectPoint/smXML:CI_OnlineResource/smXML:linkage/smXML:URL'
</deegree:Value>
</deegree:Parameter>
The parameter XPathToServiceType supplies the path to the service type of the service, that has the Title XPathToServiceTitle.
<deegree:Parameter>
<deegree:Name>XPathToServiceType</deegree:Name>
<deegree:Value>
</deegree:Value>
'smXML:identificationInfo/iso19119:CSW_ServiceIdentification/iso19119:serviceType/smXML:CharacterString'
</deegree:Parameter>
The parameter XPathToServiceTypeVersion supplies the path to the version of the service type.
<deegree:Parameter>
<deegree:Name>XPathToServiceTypeVersion</deegree:Name>
<deegree:Value>
'smXML:identificationInfo/iso19119:CSW_ServiceIdentification/iso19119:serviceTypeVersion/smXML:CharacterString'
</deegree:Value>
</deegree:Parameter>
The transformation files are used to transform the
xml-encoded files of the CSW into HTML. Furthermore, they define the
subset of the metadata that is displayed in the portal. In the CSW
client module of the Web Map Context (e.g. wmc_testCswClient.xml)
the used transformation files are defined using the parameter
Profiles.* (see section 4.13.1.2). The structure of the files should
not be changed, as usually only adjustment of the HTML contents are
necessary.
The file metaList2html.xsl lists the results of a query.
The first template is executed in case the CSW sends an error message:
<xsl:template match="ogc:ServiceExceptionReport">
<table class="except">
<tr>
<td class="key">Error</td>
<td class="val">
<xsl:value-of select="./ogc:ServiceException"/>
</td>
</tr>
</table>
</xsl:template>
The following template should be left unchanged:
<xsl:template match="csw:GetRecordsResponse">
<xsl:apply-templates select="csw:SearchResults"/>
</xsl:template>
In this template another template (<xsl:template match="csw:SearchResults">) is included, that can be adjusted. The corresponding part are displayed here in detail.
The complete page is built using a table of three rows. The first row shows the heading, the second adds the list of query results, while the third adds buttons for navigating through the result set.
The following segment declares the heading on top of the query results.
<tr>
<td class="key" colspan="2">
Catalogue
<xsl:value-of
select="$CATALOG"/>
hat insgesamt
<xsl:value-of
select="$HITS"/>
Ergebnisse.
</td>
</tr>
All further rows of the
table will only be displayed if the result set is greater than 0.
First, a list of all hits is defined (<ul>).
<tr>
<td class="val" colspan="2">
<ul><xsl:apply-templates select="iso19115brief:MD_Metadata"/></ul>
</td>
</tr>
If the file should not be used for processing ISO 19115 queries, but for OGCCORE, the name of the node to select has to be adjusted.
Following is a row with the buttons for navigating the result set. The left cell includes the graphics file for going backward, the right one for going forwards.
<tr>
<td width="50%" align="right">
<xsl:choose>
<xsl:when test="$STARTPOS > 0">
<a href="{$previousPage}">
<img src="./images/csw_previous.gif" border="0" alt="prevpage"/>
</a>
</xsl:when>
<xsl:otherwise>
<xsl:text disable-output-escaping="yes">&nbsp;</xsl:text>
</xsl:otherwise>
</xsl:choose>
</td>
<td width="50%" align="left">
<xsl:choose>
<xsl:when test="($STARTPOS + $recReturned) < $HITS">
<a href="{$nextPage}">
<img src="./images/csw_next.gif" border="0" alt="nextpage" />
</a>
</xsl:when>
<xsl:otherwise>
<xsl:text disable-output-escaping="yes">&nbsp;</xsl:text>
</xsl:otherwise>
</xsl:choose>
</td>
</tr>
The graphics files can be replaced by text or other graphics.
The last template in the file fills the list of found hits. At the beginning, a number of variables is declared, that is then used for the list entry and the corresponding reference. Basically, adjustments to this template are limited to the style of the list entry and the reference (in bold).
<xsl:template match="iso19115brief:MD_Metadata">
<xsl:variable name="ident">
<xsl:value-of select="./iso19115brief:fileIdentifier/smXML:CharacterString"/>
</xsl:variable>
<xsl:variable name="title">
<xsl:value-of select="./iso19115brief:identificationInfo/smXML:MD_DataIdentification/smXML:citation/smXML:CI_Citation/smXML:title/smXML:CharacterString"/>
</xsl:variable>
<xsl:variable name="minx">
<xsl:value-of select="./iso19115brief:identificationInfo/smXML:MD_DataIdentification/smXML:extent/smXML:EX_Extent/smXML:geographicElement/smXML:EX_GeographicBoundingBox/smXML:westBoundLongitude/smXML:approximateLongitude"/>
</xsl:variable>
<xsl:variable name="maxx">
<xsl:value-of select="./iso19115brief:identificationInfo/smXML:MD_DataIdentification/smXML:extent/smXML:EX_Extent/smXML:geographicElement/smXML:EX_GeographicBoundingBox/smXML:eastBoundLongitude/smXML:approximateLongitude"/>
</xsl:variable>
<xsl:variable name="miny">
<xsl:value-of select="./iso19115brief:identificationInfo/smXML:MD_DataIdentification/smXML:extent/smXML:EX_Extent/smXML:geographicElement/smXML:EX_GeographicBoundingBox/smXML:southBoundLatitude/smXML:approximateLatitude"/>
</xsl:variable>
<xsl:variable name="maxy">
<xsl:value-of select="./iso19115brief:identificationInfo/smXML:MD_DataIdentification/smXML:extent/smXML:EX_Extent/smXML:geographicElement/smXML:EX_GeographicBoundingBox/smXML:northBoundLatitude/smXML:approximateLatitude"/>
</xsl:variable>
<xsl:variable name="args" select="concat( $quote, $ident, $quote, ', ', $quote, $CATALOG, $quote, ', ', $minx, ', ', $miny, ', ', $maxx, ', ', $maxy, ', ', $quote, 'showMetadataOverview', $quote )" />
<xsl:variable name="href" select="concat( 'javascript:getMetadata( ', $args, ' )' )"/>
<li>
<a href="{$href}"><xsl:value-of select="$ident"/></a>
</li>
</xsl:template>
Additional adjustments would only be necessary if the structure of the ISO 19115 should be changed or if it is intended to use OGCCORE queries. In the latter case, this should be done in a separate file.
The file metaContent2html.xsl is defined in the Web Map Context for display of a single result (see section 4.13.2.5). The distinction between overview and detailed display is done by inclusion of two additional files.
<xsl:include
href="file:///absolute/path/to/$iGeoPortal_home$/WEB-INF/conf/igeoportal/metaOverview2html.xsl"/>
<xsl:include
href="file:///absolute/path/to/$iGeoPortal_home$/WEB-INF/conf/igeoportal/metaDetails2html.xsl"/>
A
distinction is made between different headings and contents by using
the parameter <xsl:param
name="METAVERSION"/>.
<xsl:template match="csw:GetRecordByIdResponse">
<table align="center">
<tr>
<td>
<xsl:if test="$METAVERSION = 'overview'">
<p class="title">searchResult item overview</p>
</xsl:if>
<xsl:if test="$METAVERSION = 'detailed'">
<p class="title">searchResult item details</p>
</xsl:if>
</td>
</tr>
<tr>
<td>
<xsl:if test="$METAVERSION = 'overview'">
<xsl:call-template name="OV_MD_Metadata"/>
</xsl:if>
<xsl:if test="$METAVERSION = 'detailed'">
<xsl:call-template name="DE_MD_Metadata"/>
</xsl:if>
</td>
</tr>
</table>
</xsl:template>
The templates marked in bold are read from the included files and have to be adjusted if needed.
The file metaOverview2html.xsl defines which information will be displayed in the metadata overview. It is possible to adjust these values by editing the template (possibly defining additional variables).
<!-- variables -->
<xsl:variable name="ServLength">
<xsl:value-of select="string-length($SERVICECATALOGS)"/>
</xsl:variable>
<xsl:variable name="ident">
<xsl:value-of select="./iso19115:MD_Metadata/iso19115:fileIdentifier/smXML:CharacterString"/>
</xsl:variable>
<xsl:variable name="title">
<xsl:value-of select="./iso19115:MD_Metadata/iso19115:identificationInfo/smXML:MD_DataIdentification/smXML:citation/smXML:CI_Citation/smXML:title/smXML:CharacterString"/>
</xsl:variable>
<xsl:variable name="minx">
<xsl:value-of select="./iso19115:MD_Metadata/iso19115:identificationInfo/smXML:MD_DataIdentification/smXML:extent/smXML:EX_Extent/smXML:geographicElement/smXML:EX_GeographicBoundingBox/smXML:westBoundLongitude/smXML:approximateLongitude"/>
</xsl:variable>
<xsl:variable name="maxx">
<xsl:value-of select="./iso19115:MD_Metadata/iso19115:identificationInfo/smXML:MD_DataIdentification/smXML:extent/smXML:EX_Extent/smXML:geographicElement/smXML:EX_GeographicBoundingBox/smXML:eastBoundLongitude/smXML:approximateLongitude"/>
</xsl:variable>
<xsl:variable name="miny">
<xsl:value-of select="./iso19115:MD_Metadata/iso19115:identificationInfo/smXML:MD_DataIdentification/smXML:extent/smXML:EX_Extent/smXML:geographicElement/smXML:EX_GeographicBoundingBox/smXML:southBoundLatitude/smXML:approximateLatitude"/>
</xsl:variable>
<xsl:variable name="maxy">
<xsl:value-of select="./iso19115:MD_Metadata/iso19115:identificationInfo/smXML:MD_DataIdentification/smXML:extent/smXML:EX_Extent/smXML:geographicElement/smXML:EX_GeographicBoundingBox/smXML:northBoundLatitude/smXML:approximateLatitude"/>
</xsl:variable>
<xsl:variable name="topicCategory"><!-- this variable is optional -->
<xsl:value-of select="./iso19115:MD_Metadata/iso19115:identificationInfo/smXML:MD_DataIdentification/smXML:topicCategory/smXML:MD_TopicCategoryCode"/>
</xsl:variable>
<xsl:variable name="quote">
<xsl:text disable-output-escaping="yes">'</xsl:text>
</xsl:variable>
<xsl:variable name="args" select="concat( $quote, $ident, $quote, ', ', $quote, $title, $quote, ', ', $quote, $CATALOG, $quote, ', ', $minx, ', ', $miny, ', ', $maxx, ', ', $maxy, ', ', $quote, $SERVICECATALOGS, $quote )" />
<xsl:variable name="shoppingRef" select="concat( 'javascript:addToShoppingCart( ', $args, ' );' )"/>
Besides „topicCategory“ all of
the listed variables are needed for program execution. If the
ISO 19115 schema is changed it might be necessary to adjust the
paths. Additional variables can be used to extend the overview table.
<!-- contents -->
<table class="md">
<tr>
<td class="key">TopicCategory</td>
<td class="val"><xsl:value-of select="$topicCategory"/></td>
</tr>
<tr>
<td class="key">Identifier</td>
<td class="val"><xsl:value-of select="$ident"/></td>
</tr>
<tr>
<td class="key">Title</td>
<td class="val"><xsl:value-of select="$title"/></td>
</tr>
<tr>
<td class="key">ServiceCatalogues</td>
<xsl:choose>
<xsl:when test="$ServLength > 0">
<td class="val"><xsl:value-of select="$SERVICECATALOGS"/></td>
</xsl:when>
<xsl:otherwise>
<td class="val">keine Service-Catalogues verfügbar</td>
</xsl:otherwise>
</xsl:choose>
</tr>
</table>
For this, additional rows have to be added to the table that refer to additional variables. The style of the table can also be adjusted.
Following the metadata overview a table with buttons is declared allowing the user to access display of detailed metadata, to add the dataset to the shopping cart (at least if a corresponding WMS or WFS is available) or to close the metadata overview window.
<!-- control elements -->
<table class="spacetop" width="500px">
<tr>
<td width="30%" align="middle">
<a href="javascript:getMetadataDetails();">
<img src="./images/csw_details.gif" border="0" />
</a>
</td>
<td width="40%" align="middle">
<xsl:choose>
<xsl:when test="$ServLength > 0">
<a href="{$shoppingRef}">
<img src="./images/csw_add_to_choice.gif" border="0"/>
</a>
</xsl:when>
<xsl:otherwise>
<xsl:text disable-output-escaping="yes">&nbsp;</xsl:text>
</xsl:otherwise>
</xsl:choose>
</td>
<td width="30%" align="middle">
<a href="javascript:window.close();">
<img src="./images/csw_close.gif" border="0" />
</a>
</td>
</tr>
</table>
The references can be changed from graphics-based to text-based and the style can be adjusted. The test on existence of at least one service in the second column ( test="$ServLength > 0" ) has to be kept for program execution.
In metaDetails2html.xsl
it is defined which metadata elements are displayed in the detailed
metadata view. Because the file is constructed like
metaOverview2html.xsl, only substantial differences are
explained here. The table with the buttons includes a reference back
to the metadata overview, allowing to switch between the two views.
<!-- control elements -->
<table class="spacetop" width="500px">
<tr>
<td width="30%" align="middle">
<a href="javascript:getMetadataOverview();">
<img src="./images/csw_overview.gif" border="0" />
</a>
</td>
<td width="40%" align="middle">
<xsl:choose>
<xsl:when test="$ServLength > 0">
<a href="{$shoppingRef}">
<img src="./images/csw_add_to_choice.gif" border="0"/>
</a>
</xsl:when>
<xsl:otherwise>
<xsl:text disable-output-escaping="yes">&nbsp;</xsl:text>
</xsl:otherwise>
</xsl:choose>
</td>
<td width="30%" align="middle">
<a href="javascript:window.close();">
<img src="./images/csw_close.gif" border="0" />
</a>
</td>
</tr>
</table>
All other explanations given in regard metaOverview2html.xsl to apply here as well.
First of all the CSW-Client module has to be referenced properly. A link of a button is necessary to start the metadata query (section 4.13.2.1), afterwards the module will be referenced in the Web Map Context (section 4.13.2.2), and the corresponding listeners will be declared in the controller (section 4.13.2.3). Finally the JavaScript (section 4.13.2.4) and transformation files (section 4.13.2.5) are referenced.
After these steps are accomplished the module should be ready to run, but neither the layout is adjusted nor its functionality is guaranteed, yet.
To start the CSW-Client module, the JavaScript
function openMetadata() has to be defined and has to be made ready to
execute through using a link. For this, it is advisable to adjust the
file $iGeoPortal_home$/menubartop.html
accordingly.
function openMetadata() {
var s = "control?rpc=<?xml version='1.0' encoding='UTF-8'?><methodCall>" +
"<methodName>cswClient:initClient</methodName></methodCall>";
fiw = window.open( s, "Suchen", "width=870, height=650, left=100, top=100, scrollbars=yes" );
fiw.focus();
}
<a href="javascript:openMetadata()">
<img src="./images/csw_mt_metadata.gif" border="0" title="Metadatensuche"/> </a>
The starting link can also be included in some other file, but in the following it is assumed that this possibility is used.
Only part of the module declaration is shown here. All necessary parameters will be explained in detail in section 4.13.1. A complete module declaration can be found in the iGeoPortal demo release.
<!-- CSW Client Module -->
<deegree:Module hidden="false" type="content" height="0" width="0" scrolling="no">
<deegree:Name>CswModule</deegree:Name>
<deegree:Content>cswmodule.html</deegree:Content>
<deegree:ModuleJS>cswmodule.js</deegree:ModuleJS>
<deegree:ParameterList>
...
<deegree:Parameter>
...
</deegree:Parameter>
...
</deegree:ParameterList>
</deegree:Module>
The CSW-Client module can be instantiated in any area of <deegree:Frontend> . Out of layout reasons it is advisable to choose an area that is vertically arranged, e.g. <deegree:East> or <deegree:West>.
To allow the portal to support the required
functionality, new listeners have to be declared in
$iGeoPortal_home$/WEB-INF/conf/igeoportal/.
controller.xml
<?xml version="1.0" encoding="UTF-8"?>
<controller>
...
<!-- listeners for CSW client -->
<event
name="cswClient:initClient"
class="org.deegree.portal.standard.csw.control.InitCSWModuleListener"
next="csw_main.html"
alternativeNext="csw_main.html"/>
<event
name="cswClient:simpleSearch"
class="org.deegree.portal.standard.csw.control.SimpleSearchListener"
next="csw_search_result.jsp"
alternativeNext="csw_search_result.jsp"/>
<event
name="cswClient:detailedSearch"
class="org.deegree.portal.standard.csw.control.DetailedSearchListener"
next="csw_search_result.jsp"
alternativeNext="csw_search_result.jsp"/>
<event
name="cswClient:turnPage"
class="org.deegree.portal.standard.csw.control.TurnPageListener"
next="csw_search_result.jsp"
alternativeNext="csw_search_result.jsp"/>
<event
name="cswClient:showMetadataOverview"
class="org.deegree.portal.standard.csw.control.OverviewMetadataListener"
next="csw_item_overview.jsp"
alternativeNext="csw_item_overview.jsp"/>
<event
name="cswClient:showMetadataDetails"
class="org.deegree.portal.standard.csw.control.DetailedMetadataListener"
next="csw_item_details.jsp"
alternativeNext="csw_item_details.jsp"/>
<event
name="cswClient:addToShoppingCart"
class="org.deegree.portal.standard.csw.control.AddToShoppingCartListener"
next="csw_info.jsp"
alternativeNext="csw_info.jsp"/>
<event
name="cswClient:shoppingCart"
class="org.deegree.portal.standard.csw.control.ShoppingCartListener"
next="csw_shopping_cart.jsp"
alternativeNext="csw_shopping_cart.jsp"/>
<event
name="cswClient:deleteFromShoppingCart"
class="org.deegree.portal.standard.csw.control.DeleteFromShoppingCartListener"
next="csw_shopping_cart.jsp"
alternativeNext="csw_shopping_cart.jsp"/>
<event
name="cswClient:displayMap"
class="org.deegree.portal.standard.csw.control.DisplayMapListener"
next="csw_close_window.jsp"
alternativeNext="csw_close_window.jsp"/>
</controller>
All files described in this section together build
the user interface for the CSW-Client module. All files have to be
stored in $iGeoPortal_home$/modules/csw.
|
File name |
Content |
|---|---|
|
|
These two files define the CS-W Client module and are responsible for initialisation. |
|
|
These files define the the two parts of the window, a static navigation on the left side and a main area that changes dynamically. |
Table 1: Base files of the CSW Client module
In table 2 all files are listed that define all additionally needed JavaScript functions.
|
File name |
Content |
|---|---|
|
|
General JavaScript-functions for CSW-module. |
|
|
performSimpleSearch(): getRequestParameter(): |
|
|
createReqRPC(): turnPage(): |
|
|
Functions defining the “shopping cart”. |
Table 2: JavaScript-files for the CSW-Client module
The following table lists all JSP-files of the module.
|
File name |
Content |
|---|---|
|
|
Displayed text can be changed. Structural changes should be avoided. |
|
|
Additional windows needed by CSW-client module. |
Table 3: JSP-files for the CSW-Client module
Finally the transformation files in folder
$iGeoPortal_home$/WEB-INF/conf/igeoportal/csw that allow
to display query results have to be included. These transformation
files are needed to create HTML-fragments that can be used by the
portal out of the responses of the CSW.
The file metaList2html.xsl is responsible for listing the results of a query. metaContent2html.xsl is used for displaying information to the different hits. Two further files are referenced here (metaOverview2html.xsl and metaDetails2html.xsl), which are used to differentiate between displaying the overview and the detailed metadata. Further explanation has been given in section 4.13.1.9.
Unpack the igeoportal-std.war (which
is nothing more than a .zip file) to a
directory (e.g. c:/deegree/webapps/igeoportal-std) of your choice.
Afterwards Tomcat needs information about the root directory of the application. The easiest way is to create a XML-file in the directory $TOMCAT_HOME$/conf/Catalina/localhost, named the same as the service e.g. igeoportal-std.xml, and fill it with the following information
<Context docBase="c:/deegree/webapps/igeoportal-std" path="/igeoportal-std">
</Context>
where the docBase attribute reflects the physical location of the deegree service in the file system and the path attribute describes the virtual location of the main directory of the deegree web service. In the example, the root directory of the service is accessible at http://my.server.domain/igeoportal-std/. For further information have a look at the Tomcat documentation included with the installation.
The name of the deegree-service directory is arbitrary whereas Tomcat definitely looks for a subdirectory WEB-INF (in capital letters – even on a Windows system) in the root directory. You will find this directory after tomcat automatically unpacked the war archive or in the home directory where you placed the application. Here the Deployment-Descriptor (web.xml) is located, which is analysed by Tomcat to identify the servlet(s) belonging to the application, their names, the parameters that are delivered to the servlet(s) and information about the existing access restrictions.
As part of the initialization the portal servlet
receives some initialization parameters that have to be defined in
the deployment descriptor ($iGeoPortal_home$/WEB-INF/web.xml).
The following XML document gives an example of a deployment
descriptor; initialization parameters will be described in detail
below.
<?xml version="1.0" encoding="ISO-8859-1"?>
<!DOCTYPE web-app PUBLIC "-//Sun Microsystems, Inc.//DTD Web Application 2.3//EN"
"http://java.sun.com/j2ee/dtds/web-app_2.3.dtd">
<web-app>
<display-name>deegree iGeoportal standard edition v2.2</display-name>
<!--
<filter>
<filter-name>LoggingFilter</filter-name>
<filter-class>org.deegree.enterprise.servlet.LoggingFilter</filter-class>
<init-param>
<param-name>sourceAddresses</param-name>
<param-value>127.0.0.1</param-value>
</init-param>
<init-param>
<param-name>mimeTypes</param-name>
<param-value>text/xml;plain/text</param-value>
</init-param>
<init-param>
<param-name>metaInfo</param-name>
<param-value>true</param-value>
</init-param>
</filter>
<filter-mapping>
<filter-name>LoggingFilter</filter-name>
<url-pattern>/*</url-pattern>
</filter-mapping>
-->
<servlet>
<servlet-name>RequestHandler</servlet-name>
<servlet-class>org.deegree.portal.standard.PortalRequestDispatcher</servlet-class>
<init-param>
<param-name>Handler.configFile</param-name>
<param-value>WEB-INF/conf/igeoportal/controller.xml</param-value>
</init-param>
<init-param>
<param-name>MapContext.configFile</param-name>
<param-value>WEB-INF/conf/igeoportal/wmc_start_utah.xml</param-value>
</init-param>
</servlet>
<servlet>
<servlet-name>PrintAccess</servlet-name>
<servlet-class>org.deegree.enterprise.servlet.DirectoryAccessServlet</servlet-class>
<init-param>
<param-name>ROOTDIR</param-name>
<param-value>./print/</param-value>
</init-param>
<load-on-startup>1</load-on-startup>
</servlet>
<servlet-mapping>
<servlet-name>RequestHandler</servlet-name>
<url-pattern>/control</url-pattern>
</servlet-mapping>
<servlet-mapping>
<servlet-name>PrintAccess</servlet-name>
<url-pattern>/print</url-pattern>
</servlet-mapping>
<welcome-file-list>
<welcome-file>welcome.html</welcome-file>
</welcome-file-list>
</web-app>
The server side component of the portal is
represented by the RequestHandler servlet. In the
example configuration the servlet is mapped to 'control' and so can
be accessed via http://myHost[:port]/igeoportal-std/control.
The
RequestHandler servlet (control) receives two initialization
parameters (<init-param>):
Handler.configFile: XML-document, in which both a responsible java class and a resulting JSP/HTML-page are defined for each event that is triggered by the client and sent to the server. For standard configuration this file does not have to be adjusted.
MapContext.configFile: XML-document, where state and layout of the portal at its initialization are defined. The document is compliant with the XML-schema defined in OGC's Web Map Context specification. The context defined in web.xml will be used as default, in case a user (HTML-page) has called iGeoPortal without defining a desired context.
There is a number of additional configuration
files that can be adjusted if you want to make some more substantial
changes to your iGeoPortal than the ones that can be done by merely
editing mapcontexts WMC_yourcontextname.xml. These are XSL files
located at $iGeoPortal_home$/WEB-INF/conf/igeoportal.
Only context2HTML.xsl is of relevance at this point, all other xsl
file should be better left unchanged.
In the directory
$iGeoPortal_home$/WEB-INF/conf/igeoportal/ you will find
a file named context2HTML.xsl. Some of the parameters here define
some general settings that are useful to know about and are described
in the following:
<xsl:variable name="vBackgrColor">#338833</xsl:variable>
defines the standard background color of the portal.
<xsl:variable name="vClientWidth">990</xsl:variable>
<xsl:variable name="vClientHeight">700</xsl:variable>
defines the overall width an height of the portal.
<xsl:variable name="vHeaderHeight">0</xsl:variable>
<xsl:variable name="vFooterHeight">30</xsl:variable>
<xsl:variable name="vNorthHeight">25</xsl:variable>
...
<xsl:variable name="vSouthHeight">25</xsl:variable>
<xsl:variable name="vWestWidth">180</xsl:variable>
<xsl:variable name="vEastWidth">210</xsl:variable>
These parameters define the size of the areas as they are defined in section 3.2.2. The other parameters should usually not be modified.
As described in section 5.1.2 a default map
context document can be passed to the portal by using the
init-parameter mapContext.configFile in
$iGeoPortal_home$/WEB-INF/web.xml.
Alternatively the name of a context document file
can be passed by invoking the portal's contextSwitch method. This
will be performed by sending a Remote Procedure Call (RPC) to the
portal's server component (see example below). All context documents
have to be stored in the $iGeoPortal_home$/WEB-INF/conf/igeoportal/
directory and all RPC methods have to be defined in the XML-document
referenced by the init-parameter Handler.configFile in
$iGeoPortal_home$/WEB-INF/web.xml in order to make them
known to the portal.
The following example shows an RPC for the method
mapClient:contextSwitch (as defined in
$iGeoPortal_home$/WEB-INF/conf/igeoportal/controller.xml).
The context document to be used by the method is mapcontext1.xml.
http://localhost[:port]/igeoportal/control?rpc=<?xml version='1.0' encoding='UTF-8'?><methodCall><methodName>mapClient:contextSwitch</methodName><params><param><value><struct><member><name>mapContext</name><value><string>mapcontext1.xml</string></value></member><member><name>boundingBox</name><value><struct><member><name>minx</name><value><double>2570000</double></value></member><member><name>miny</name><value><double>5668000</double></value></member><member><name>maxx</name><value><double>2593000</double></value></member><member><name>maxy</name><value><double>5691000</double></value></member></struct></value></member></struct></value></param></params></methodCall>
Note: the value of the paramter 'rpc' in the http request has to be URL encoded!
Besides starting the portal by loading a specific map context, an initial bounding box can be passed to the portal. Both context name and bounding box are encoded as RPC parameters. If no bounding box is defined the bounding box definition will be read from the map context document.
For better readability the next example is displayed in typical XML-style. Its usage is the same as describe above.
<?xml version="1.0" encoding="UTF-8"?>
<methodCall>
<methodName>mapClient:contextSwitch</methodName>
<params>
<param>
<value>
<struct>
<member>
<name>mapContext</name>
<value>
<string>mapcontext1.xml</string>
</value>
</member>
<member>
<name>boundingBox</name>
<value>
<struct>
<member>
<name>minx</name>
<value>
<double>2570000</double>
</value>
</member>
<member>
<name>miny</name>
<value>
<double>5668000</double>
</value>
</member>
<member>
<name>maxx</name>
<value>
<double>2593000</double>
</value>
</member>
<member>
<name>maxy</name>
<value>
<double>5691000</double>
</value>
</member>
</struct>
</value>
</member>
</struct>
</value>
</param>
</params>
</methodCall>
There are two different kinds of modules deegree iGeoPortal uses:
modules including HTML and JavaScript components only
modules having a server component in addition to the required JavaScript object and HTML page.
Common to each module is as mentioned above its interface. A module's interface is made of a HTML page (from a static or dynamic resource) and a JavaScript object having the same name as the module (consider that the name is case sensitive). A modules JavaScript object must receive a parameter named 'id'. It may receive some additional, but optional, parameters. If an object expects parameters other than 'id' they have to be defined in a module's parameterList when registered to the portal/context (see above). Each JavaScript object corresponding to a module must implement the two methods paint(...) and repaint(). The paint-method will be called every time when the state of the portal has been changed (e.g. by a zoomin or a context-loading). One can force calling the paint-methods of all registered modules by calling the controllers repaint-method ( [parent.]controller.repaint() ).
This is an example for a valid JavaScript object being part of the MenuBarTop module:
function MenuBarTop (id) {
this.id = id;
this.paint = paint;
this.repaint = repaint;
function paint(targetDocument, parentNode) {}
function repaint() {}
}
Note that the paint-method receives two arguments. Because 'paint' will be realized as a set of DHTML-operations manipulating the modules DOM object (document) a reference to it must be passed. The first passed parameter is a reference to the DOM object (document of the modules HTML-page) the content should be painted to. The second is a reference to the documents element underneath DHTML operations shall be performed (just to be used by some special modules).
For each of both types of modules in the following we will develop a small example that demonstrates the principle idea behind iGeoPortal modules.
Imagine a simple function for the portal that enables us to enter boundingBox coordinates directly through four text fields. Such a module is composed of two parts. The first is for visualizing the areas value; the second is for updating the map (model) and refreshing the view. Let's name the new module 'BboxInput1'.
First we define our JavaScript object:
function BBoxInput1 (id) {
this.id = id;
this.targetDocument = null;
this.parentNode = null;
this.paint = paint;
this.repaint = repaint;
this.updateMap = updateMap;
function paint(targetDocument, parentNode) {
this.targetDocument = targetDocument;
this.parentNode = parentNode;
this.repaint();
}
function repaint() {
var bbox = parent.controller.mapModel.getBoundingBox();
var minx = this.targetDocument.getElementById( 'WEST' );
minx.value = bbox.minx;
var maxx = this.targetDocument.getElementById( 'EAST' );
maxx.value = bbox.maxx;
var miny = this.targetDocument.getElementById( 'SOUTH' );
miny.value = bbox.miny;
var maxy = this.targetDocument.getElementById( 'NORTH' );
maxy.value = bbox.maxy;
}
function updateMap( minx, miny, maxx, maxy ) {
var env = new Envelope( minx, miny, maxx, maxy );
var event = new Event( 'BBoxInput1', 'BBOX', env );
parent.controller.actionPerformed( event );
}
}
The object just expects an 'id' passed to it. This will be set automatically by deegree. We define two additional 'instance' variable – targetDocument and parentNode – that will be set when the paint-method is called the first time. In addition to the two mandatory methods paint and repaint we define the method updateMap which will be used for updating the maps bounding box and repainting the map.
In detail we see the paint method does nothing but storing the passed arguments in corresponding instance variables and calling the repaint method of the instance. The repaint method is a bit more interesting.
var bbox = parent.controller.mapModel.getBoundingBox();
The statement above returns the bounding box of the current map as an instance of Envelope (see envelope.js). 'parent' enables access to the document that includes the modules HTML-page as iFrame. The parent offers an object named 'controller' which is the central 'connecting'-point for all modules. All modules are automatically registered here. All events (see below) will also be send to the controller who decides what to do. The controller itself is no fixed JavaScript object, it will be generated by a XSLT script when loading a context (see viewcontext.xsl).
As a central object of iGeoPortal the controller offers access to the model of the current map through the variable 'mapModel'. The map's model contains information on layers, styles, used WMSs, size, boundingBox etc.. Our interest targets the map's boundingBox.
What we would like to do in the repaint method is to write the value of the current bounding box into the four input fields we defined in our HTML-page (see below). For this we access the fields through their document and ID and assign the new values. We can do this because we stored targetDocument passed to the paint method in an instance variable. Because paint- and so repaint-method will be called automatically by iGeoPortal whenever needed we don't have to spend a thought about when or how the correct maps bounding box will be set.
As you see the repaint-method doesn't contain any magic. But at first look this seems different than the updateMap-method. The method takes four arguments representing the desired new bounding box of the map that will be encapsulated in an Envelope object. Now the interesting part of the method starts. Instead of passing the new bounding box directly to the map model we encapsulate it into an Event object. The Event object expects three arguments when initialize The first argument is the name of the object that will force the event, the second is the events name. To pass a new bounding box to the map the required event name is 'BBOX'. The third argument is the events value; in this case the desired bounding box.
As said above the controller object is the central managing object for communication between modules in iGeoPortal. For this behavior it offers a method that receives events and depending on their content delegates them to other modules or performs the desired action.
parent.controller.actionPerformed( event );
In our case the controller extracts the events value (new bounding box), updates the mapmodel and forces a repaint of all registered modules. So each module that may depends on the state of the map model gets the chance to update itself. This is the reason why no module should ever change the map model directly!There may be a few exceptions to this rule but it will be exceptions and you must be absolutely sure what you are doing.
As you can see: there is even no magic here ( the only magic is the dynamic creation of the controller, but at the moment this shouldn't be your problem :-) )
Yet we have a JavaScript object, what we need now is a HTML page that offers a GUI for our module. We like to define a new box so we must have four input elements and one button that forces the update. This should not be so complicated:
<html>
<head>
<link href="css/standard.css" rel="stylesheet" type="text/css" />
<title>bboxinput1 module</title>
<script LANGUAGE="JavaScript1.2" TYPE="text/javascript">
<!--
function register() {
if ( parent.controller == null ) {
parent.controller = new parent.Controller();
parent.controller.init();
}
}
function initBBoxInput1() {
parent.controller.initBBoxInput1(document);
}
function updateMap() {
var minx = document.getElementById( 'WEST' ).value;
var maxx = document.getElementById( 'EAST' ).value;
var miny = document.getElementById( 'SOUTH' ).value;
var maxy = document.getElementById( 'NORTH' ).value;
parent.controller.vBBoxInput1.updateMap( minx, miny, maxx, maxy );
}
-->
</script>
</head>
<body onload="register(); initBBoxInput1();">
<table>
<tbody>
<tr>
<td>north: </td>
<td>
<input type="text" id="NORTH" size="8" />
</td>
</tr>
<tr>
<td>west: </td>
<td>
<input type="text" id="WEST" size="8" />
</td>
</tr>
<tr>
<td>south: </td>
<td>
<input type="text" id="SOUTH" size="8"/>
</td>
</tr>
<tr>
<td>east: </td>
<td>
<input type="text" id="EAST" size="8"/>
</td>
</tr>
</tbody>
</table>
<input type="button" value="set bbox" onclick="updateMap();"></input>
</body>
</html>
This looks a little bit more complicated than expected. The contents of the body-element are self-explaining, but what about the JavaScript section? As we can see the body-element registers an onload-event. So each time the page will be loaded the methods register() and initBBoxInput1() will be called (both methods must be called exactly in this order!). The first one ensures that the central controller has been initialised. It shall be used in this way in each module page! The second initialises the JavaScript object assigned to the module.
parent.controller.initBBoxInput1(document);
To do this a method named initBBoxInput1 of the controller object is called and the document of this HTML page is passed as a parameter. The trick is that the XSLT script mentioned above will create an init-method for each module registered in a deegree map context within the controller. The methods names always will start with 'init' followed by the modules name (consider case sensitivity). Each init-method expects the document of the HTML page it is being called from.
As third method updateMap() is defined. It will be called if the user performs a mouse click on the button below the input fields. At first the values from the input fields are read and assigned to four variables. Then the interesting bit happens. The updateMap-method defined in our BboxInput1 object is called by an instance of this object available through the controller!
This is also a general behavior of each registered module. iGeoPortal creates an instance of the JavaScript object assigned to a module and stores the instance in a variable having the name of the module with prefix 'v' (vBBoxInput1 in our example module). In principle it is possible to access each JavaScript object assigned to a module from every other module. But you should avoid this and use the event-mechanism described above to ensure that all registered modules are in a consistent state.
The last thing to do is to register the new module to a context and load this into the portal. Add the following lines to mapcontext1.xml in the west area section below the mapoverview module:
<deegree:Module hidden="false" type="content" width="200" height="150">
<deegree:Name>BBoxInput1</deegree:Name>
<deegree:Content>bboxinput2.html</deegree:Content>
<deegree:ModuleJS>bboxinput1.js</deegree:ModuleJS>
</deegree:Module>
After reloading the portal you should see the module in your browser window (see Figure 4)
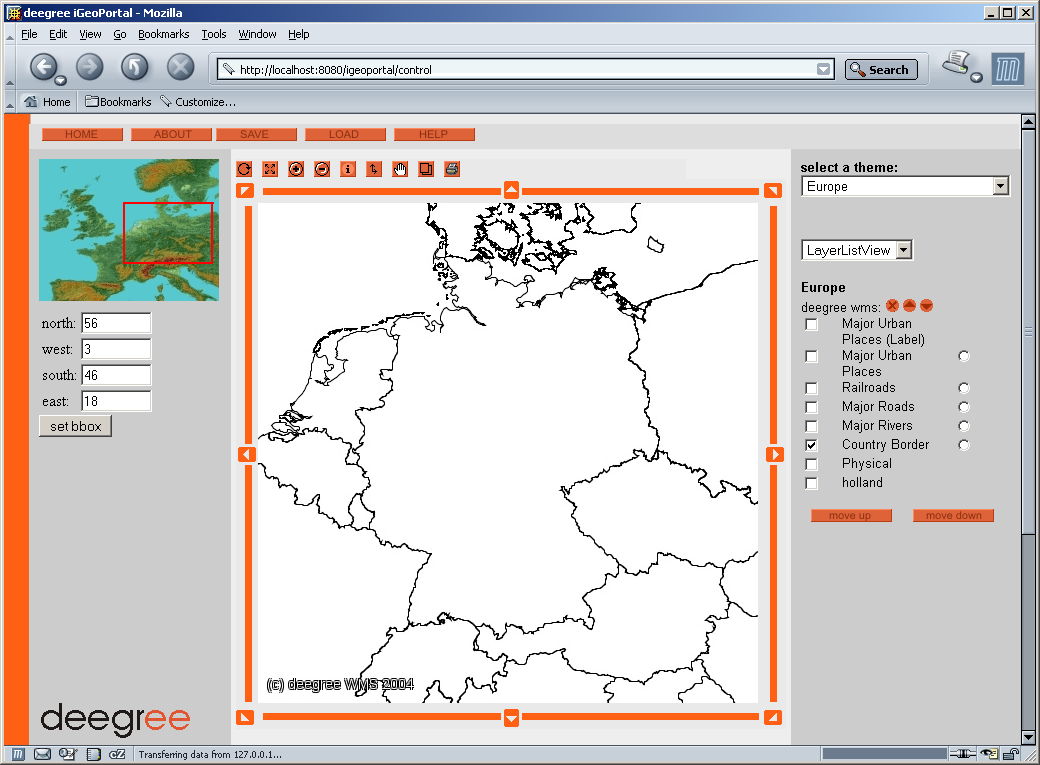
Figure
4: mapcontext1 with BBoxInput1 module
As you have seen, writing a new module for
deegree iGeoPortal is not as complicated as it first seems. Our
example module can still be improved, for example by adding
validations for the values read from the input fields, but
principally it's a complete module that doesn't use a server side
component. In the demo iGeoPortal MapOverview or Legend are also
modules without a server component which are doing a more
sophisticated job than our example.
This chapter describes how a module can delegate complex operations to a server side component where we are able to use the whole capability of a real programming language. A detailed description of deegree's mechanism for handling server sided client/portal components is beyond the scope of this documentation and could, for instance, be part of a workshop.
To demonstrate how server sided components can be used with an iGeoPortal module we will extend our example by adding a server sided validation component. The component should ensure that the box entered by a user is:
a) valid (min < max) and
b)
having a size > 2 (measured in units of the current CRS).
Generally speaking there wouldn't be a problem in carrying out the validation by some JavaScript methods but we want to have a simple example that demonstrates the general mechanism and not some deegree features for accessing foreign services or external data sources.
Two things must be done:
a) writing a Java class that validates the input
b) enabling our portal component to communicate with the portal server.
At first the Java class; deegree offers a
mechanism for registering listeners for requests coming in from a web
client and delegating a request to the responsible listener (Java
class). For a Java class to be able to act as a listener for web
requests, it must implement the interface
org.deegree.enterprise.control.WebListener or, even
better, extend the abstract class
org.deegree.enterprise.control.AbstractListener.
Considering the last option a listener class has to implement the
method public void actionPerformed(FormEvent event). So the following
code fragment is a complete and valid listener in context of deegree:
package de.latlon;
import org.deegree.enterprise.control.AbstractListener;
import org.deegree.enterprise.control.FormEvent;
public class BBoxInputValidationListener extends AbstractListener {
public void actionPerformed( FormEvent event ) {
// add some code here
}
}
It is good deegree coding style to name the listener according to what it is doing and adding the postfix 'Listener' to the class name.
At the moment our listener does not do anything so we have to add some functionality to it. The first thing to be done is to get the parameters sent by the client. As we will see later the client will send its request as a XML-Remote Procedure Call (RPC; see http://www.xmlrpc.com/spec for details). Because RPCs are mapped to a sub-class of FormEvent first we type cast the incoming event:
RPCWebEvent rpc = (RPCWebEvent)event;
This enables us to directly access the RPC parameters.
The RPC sent by the client will look like this:
<?xml version="1.0" encoding="UTF-8"?>
<methodCall>
<methodName>myFunction:validateBBoxInput</methodName>
<params>
<param>
<value>
<struct>
<member>
<name>minx</name>
<value>
<double>2.2</double>
</value>
</member>
<member>
<name>miny</name>
<value>
<double>46.1</double>
</value>
</member>
<member>
<name>maxx</name>
<value>
<double>17.8</double>
</value>
</member>
<member>
<name>maxy</name>
<value>
<double>55.8</double>
</value>
</member>
</struct>
</value>
</param>
</params>
</methodCall>
It is good deegree style to use a namespace prefix for the method name and name a method according to its functionality. How deegree is able to find the correct listener class for a RPC method/request will be explained later. At the moment we just accept that a java class representation will be passed to the actionPerformed method as an instance of RPCWebEvent.
The following code fragment shows how to access the events/methods values:
public void actionPerformed( FormEvent event ) {
RPCWebEvent rpc = (RPCWebEvent)event;
RPCMethodCall mc = rpc.getRPCMethodCall();
// note that an RPC parameter is not named, but we know our method call
// contains just one parameter
RPCParameter param = mc.getParameters()[0];
// we also know that the parameters value is a RPC structure
// (mapped to RPCStruct class)
RPCStruct struct = (RPCStruct)param.getValue();
// at least we know the names of the structure members and their data type
Double minx = (Double)struct.getMember("minx").getValue();
Double miny = (Double)struct.getMember("miny").getValue();
Double maxx = (Double)struct.getMember("maxx").getValue();
Double maxy = (Double)struct.getMember("maxy").getValue();
double[] box = adjustBoundingBox( minx.doubleValue(), miny.doubleValue(),
maxx.doubleValue(), maxy.doubleValue() );
// TODO
// handle result ...
}
The called method adjustBoundingBox
should do the work we defined above for our listener and so it has to
be implemented in the listener class.
private double[] adjustBoundingBox( double minx, double miny,
double maxx, double maxy ) {
double t = 0;
// adjust min/max values
if ( minx > maxx ) {
t = minx;
minx = maxx;
maxx = t;
}
if ( miny > maxy ) {
t = miny;
miny = maxy;
maxy = t;
}
// adjust size
if ( maxx - minx < 2 ) {
maxx = minx + 2;
}
if ( maxy - miny < 2 ) {
maxy = miny + 2;
}
return new double[] { minx, miny, maxx, maxy };
}
(please remember: this is not for getting a prize for best or most useful code, it's just for demonstration!)
The next question is: “How can we send back our result to the client?” We use a mechanism called request forwarding that is encapsulated by the deegree client/portal framework so it won't be explained in detail here.
Because we extend the AbstractListener
class we have access to the request which is to be forwarded:
ServletRequest req = this.getRequest();
Using this method we can pass an attribute to it containing our adjusted bounding box:
req.setAttribute( "BBOX",box );
That it's; there is nothing more to do.
The complete listener looks like this:
package de.latlon;
import javax.servlet.ServletRequest;
import org.deegree.enterprise.control.AbstractListener;
import org.deegree.enterprise.control.FormEvent;
import org.deegree.enterprise.control.RPCMethodCall;
import org.deegree.enterprise.control.RPCParameter;
import org.deegree.enterprise.control.RPCStruct;
import org.deegree.enterprise.control.RPCWebEvent;
public class BBoxInputValidationListener extends AbstractListener {
public void actionPerformed( FormEvent event ) {
RPCWebEvent rpc = (RPCWebEvent) event;
RPCMethodCall mc = rpc.getRPCMethodCall();
// notice that a RPC parameter is not named but we know our method call
// contains just one parameter
RPCParameter param = mc.getParameters()[0];
// we also know that the parameters value is an RPC structure
// (mapped to RPCStruct class)
RPCStruct struct = (RPCStruct) param.getValue();
// at least we know the names of the structure members and their data type
Double minx = (Double) struct.getMember( "minx" ).getValue();
Double miny = (Double) struct.getMember( "miny" ).getValue();
Double maxx = (Double) struct.getMember( "maxx" ).getValue();
Double maxy = (Double) struct.getMember( "maxy" ).getValue();
double[] box = adjustBoundingBox( minx.doubleValue(), miny.doubleValue(),
maxx.doubleValue(), maxy.doubleValue() );
ServletRequest req = this.getRequest();
req.setAttribute( "BBOX", box );
}
private double[] adjustBoundingBox( double minx, double miny,
double maxx, double maxy ) {
double t = 0;
// adjust min/max values
if ( minx > maxx ) {
t = minx;
minx = maxx;
maxx = t;
}
if ( miny > maxy ) {
t = miny;
miny = maxy;
maxy = t;
}
// adjust size
if ( maxx - minx < 2 ) {
maxx = minx + 2;
}
if ( maxy - miny < 2 ) {
maxy = miny + 2;
}
return new double[] { minx, miny, maxx, maxy };
}
}
We now have to see how we can tell deegree when it should call our listener. If you remember chapter 2 we said there is a file to be passed to the portal servlet named controller.xml. We also said there is no need to adjust the content of this file. This is true as long as we do not register new modules having server sided components. But our new module does and so we have to adjust controller.xml. In deegree iGeoPortal demo installation the files content looks like this:
<?xml version="1.0" encoding="UTF-8"?>
<controller>
<event name="GetWMSLayer" class="org.deegree.portal.standard.wms.control.GetWMSLayerListener" next="wmslayerselect.jsp"/>
<event name="mapClient:contextSwitch" class="org.deegree.portal.standard.context.control.ContextSwitchListener" next="container.jsp" alternativeNext="container.jsp"/>
<event name="mapClient:contextSave" class="org.deegree.portal.standard.context.control.ContextSaveListener" next="message.jsp" alternativeNext="container.jsp"/>
<event name="mapClient:listContexts" class="org.deegree.portal.standard.context.control.ContextLoadListener" next="loadcontext.jsp" alternativeNext="container.jsp"/>
<event name="mapView:print" class="org.deegree.portal.standard.wms.control.PrintListener" next="printview.jsp" alternativeNext="printview.jsp"/>
<event name="mapView:changeScale" class="org.deegree.portal.standard.wms.control.ScaleSwitcherListener" next="scaleswitcherproxy.jsp"/>
<event name="mapView:recenterToLayer" class="org.deegree.portal.standard.wms.control.RecenterToLayerListener" next="recentertolayerproxy.jsp"/>
<!-- event name="mapView:switchScaleBarValue" class="org.deegree.portal.standard.wms.control.ScaleBarSwitcherListener" next="scalebarswitcherproxy.jsp"/ -->
<!-- Listeners for CSW Client Module -->
<event name="cswClient:initClient" class="org.deegree.portal.standard.csw.control.InitCSWModuleListener" next="modules/csw/csw_main.html" alternativeNext="modules/csw/csw_main.html"/>
<event name="cswClient:simpleSearch" class="org.deegree.portal.standard.csw.control.SimpleSearchListener" next="modules/csw/csw_search_result.jsp" alternativeNext="modules/csw/csw_search_result.jsp"/>
<event name="cswClient:detailedSearch" class="org.deegree.portal.standard.csw.control.DetailedSearchListener" next="modules/csw/csw_search_result.jsp" alternativeNext="modules/csw/csw_search_result.jsp"/>
<event name="cswClient:singleLayerSearch" class="org.deegree.portal.standard.csw.control.SingleLayerSearchListener" next="modules/csw/csw_item_overview.jsp" alternativeNext="modules/csw/csw_item_overview.jsp"/>
<event name="cswClient:turnPage" class="org.deegree.portal.standard.csw.control.TurnPageListener" next="modules/csw/csw_search_result.jsp" alternativeNext="modules/csw/csw_search_result.jsp"/>
<event name="cswClient:showMetadataOverview" class="org.deegree.portal.standard.csw.control.OverviewMetadataListener" next="modules/csw/csw_item_overview.jsp" alternativeNext="modules/csw/csw_item_overview.jsp"/>
<event name="cswClient:showMetadataDetails" class="org.deegree.portal.standard.csw.control.DetailedMetadataListener" next="modules/csw/csw_item_details.jsp" alternativeNext="modules/csw/csw_item_details.jsp"/>
<event name="cswClient:addToShoppingCart" class="org.deegree.portal.standard.csw.control.AddToShoppingCartListener" next="modules/csw/csw_info.jsp" alternativeNext="modules/csw/csw_info.jsp"/>
<event name="cswClient:shoppingCart" class="org.deegree.portal.standard.csw.control.ShoppingCartListener" next="modules/csw/csw_shopping_cart.jsp" alternativeNext="modules/csw/csw_shopping_cart.jsp"/>
<event name="cswClient:deleteFromShoppingCart" class="org.deegree.portal.standard.csw.control.DeleteFromShoppingCartListener" next="modules/csw/csw_shopping_cart.jsp" alternativeNext="modules/csw/csw_shopping_cart.jsp"/>
<event name="cswClient:displayMap" class="org.deegree.portal.standard.csw.control.DisplayMapListener" next="modules/csw/csw_close_window.jsp" alternativeNext="modules/csw/csw_close_window.jsp"/>
<!-- Listeners for Security -->
<event name="security:login" class="org.deegree.portal.standard.security.control.LoginListener" next="loginnotice.jsp" alternativeNext="message.jsp"/>
<event name="security:logout" class="org.deegree.portal.standard.security.control.LogoutListener" next="logoutnotice.jsp" alternativeNext="logoutnotice.jsp"/>
<event name="security:getSessionID" class="org.deegree.portal.standard.security.control.GetSessionIDListener" next="getSessionId.jsp" alternativeNext="message.jsp"/>
<!-- Listeners for WFS-Gazetteer Client Module -->
<event name="wfs:gazetteer" class="org.deegree.portal.standard.wfs.control.WFSClientListener" next="modules/gazetteer/gaz_if.jsp" alternativeNext="modules/gazetteer/gaz_if.jsp"/>
<event name="wfs:take" class="org.deegree.portal.standard.wfs.control.WFSClientListener" next="modules/gazetteer/gaz_take.jsp" alternativeNext="modules/gazetteer/gaz_if.jsp"/>
<!-- Listeners for Digitizer Module -->
<event name="dig:checkGeometry" class="org.deegree.portal.standard.wfs.control.GeometryValidator" next="modules/digitizer/geom_checker_proxy.jsp" alternativeNext="message.jsp"/>
</controller>
Considering things said above you may get the idea just by having a close look at it. For each event/request identified by a unique name a listener class is defined as well as an HTML/JSP file which should be the next page called and which is receiving the forwarded request. The name of an event corresponds to the method name of a RPC. The page defined in 'next' attribute will be displayed as result to a HTML request (alternative page can be used as alternative depending on request procession; we ignore this in our example).
To enable the portal server to deal with our listener class we have to register it by adding a new entry to the controller document.
<event name="myFunction:validateBBoxInput"
class="de.latlon.BBoxInputValidationListener"
next="bboxinputproxy.jsp" />
After adding this piece of code to controller.xml
and restarting Tomcat the portal server will delegate a HTTP web
request containing a RPC with method name
myFunction:validateBBoxInput to our listener class
de.latlon.BBoxInputValidationListener. After the
listener did his work the next page bboxinputproxy.jsp
will be displayed in the client/browser. So next thing we have to do
is modifying our BBoxInput1 module in such a way that it is able to
communicate with the BBoxInputValidationListener.
There is no big difference between a module with and a module without a server sided component. Both require an HTML/JSP page and a JavaScript object. The difference and most interesting problem with a module having a server sided component is: How do we realise server communication without reloading the complete portal? OK, this is easy because our module is embedded within an iFrame so just the iFrame will be reloaded. But even this is often not a good idea, so we have to find another mechanism.
To avoid misunderstandings here is the list of things that have to be performed when setting a new bounding box to the map:
read values from the input fields,
create a RPC,
send the RPC to the portal server,
receive the answer from the portal server,
update the map with the bounding box coming from the portal server.
Compared to our simple client sided module we have
to manage three additional steps, creating a RPC, send it to the
server and handle the response. The first is easy and can be done by
string concatenation. The second isn't problematic either; just
defining a <Form>, assign the RPC to its action
attribute and finally call the submit() method. But what about
receiving and handling the response (remember we will receive a Java
double[] array). And how can we avoid reloading the iFrames content?
Answer: we will use a proxy!
In this context 'proxy' means that we extended our modules HTML page by adding an (invisible) iFrame containing a page responsible for server communication.
...
<tr>
<td>east: </td>
<td>
<input type="text" id="EAST" size="8"/>
</td>
</tr>
</tbody>
</table>
<input type="button" value="set bbox" onclick="updateMap();"></input>
<!-- invisible iframe acting as proxy for web communication -->
<iframe src="bboxinputproxy.jsp" width="0" height="0" frameborder="0"/>
</body>
</html>
As you see the proxy is a JSP page that will
enable us to receive and process Java objects handling a server
response. To act as web communication proxy the page must offer a
<Form> element that we can use to perform a
submit(). To access the proxies <Form> element and
calling submit() requires access to the DOM object (document) of the
iFrame. Now it becomes a bit complicated because it is no problem for
a page being source of an iFrame accessing the document of the page
which embeds the iFrame by using its 'parent' variable (we used this
in our module several times). The other way round there is no way for
a page/document to access the documents of its embedded iFrames
directly! But this is exactly what we need.
To solve the problem we use a little trick. The
bboxinputproxy.jsp contains some JavaScript code that
will be called when the page is loaded (catching the onload-event).
The code passes an instance of the document of the bboxinputproxy.jsp
page back to document/page that embeds the iFrame. This parent must
offer a variable that stores its child's document.
<html>
<head>
<link href="css/standard.css" rel="stylesheet" type="text/css" />
<title>bboxinput1 module</title>
<script LANGUAGE="JavaScript1.2" TYPE="text/javascript">
<!--
var proxyDoc = null;
...
The code of bboxinputproxy.jsp looks like this (response handling code is missing):
<%@ page language="java" %>
<html>
<head>
<title>bboxinputproxy</title>
<script LANGUAGE="JavaScript1.2" TYPE="text/javascript">
<!--
function register() {
parent.proxyDoc = document;
}
-->
</script>
</head>
<body onload="register();">
<form action="" id="form" method="post"></form>
</body>
</html>
So now our modules HTML page is able to use the proxy page to handle web communication. We can start constructing the RPC. Instead of calling:
parent.controller.vBBoxInput1.updateMap( minx, miny, maxx, maxy );
when the 'set box' button is clicked we now must create a RPC and pass it to the portal server. For this the updateMap method is changed to:
function updateMap() {
var minx = document.getElementById( 'WEST' ).value;
var maxx = document.getElementById( 'EAST' ).value;
var miny = document.getElementById( 'SOUTH' ).value;
var maxy = document.getElementById( 'NORTH' ).value;
// create the RPC
var rpc = '<?xml version="1.0" encoding="UTF-8"?>' +
'<methodCall><methodName>myFunction:validateBBoxInput</methodName>' +
'<params><param><value><struct><member><name>minx</name>' +
'<value><double>' + minx + '</double></value></member><member>' +
'<name>miny</name><value><double>' + miny +'</double></value>' +
'</member><member><name>maxx</name><value><double>' + maxx +
'</double></value></member><member><name>maxy</name><value>' +
'<double>' + maxy + '</double></value></member></struct></value>' +
'</param></params></methodCall>';
proxyDoc.forms[0].action = 'control?rpc=' + encodeURIComponent(rpc);
proxyDoc.forms[0].submit();
}
Take a close look at the creation of the RPC. The
result is the same XML as given above. After creating the RPC we can
set the action for the proxies <form> element
(remember: in chapter 2 we defined the portal servlet as accessible
through the name 'control'). The RPC is assigned as a value to the
parameter 'rpc' (case sensitive!). At last we call the form's submit
method to send the request to the server.
If we have configured the server correctly everything should work fine and our proxy iFrame receives the response in form of the page that is defined in the 'next' attribute of the event we added in controller.xml. This is bboxinputproxy.jsp again so we must add some code to handle the response. Because we defined a JSP instead a HTML page we are able to use some Java code to do the work. Here is the solution:
<%@ page language="java" %>
<%
double[] bbox = (double[])request.getAttribute( "BBOX" );
%>
<html>
<head>
<title>bboxinputproxy</title>
<script LANGUAGE="JavaScript1.2" TYPE="text/javascript">
<!--
function register() {
parent.proxyDoc =document;
}
function updateMap() {
<%
if ( bbox != null ) {
out.print( "var minx = " + bbox[0] + ";");
out.print( "var miny = " + bbox[1] + ";");
out.print( "var maxx = " + bbox[2] + ";");
out.print( "var maxy = " + bbox[3] + ";");
%>
parent.parent.controller.vBBoxInput1.updateMap( minx,miny,
maxx, maxy );
<%
}
%>
}
-->
</script>
</head>
<body onload="register(); updateMap();">
<form action="" id="form" method="post"></form>
</body>
</html>
What have we done? At first we added a line Java code that returns the double[] array we added to the forwarded request (remember the actionPerformed method of the listener). Then we added a new method for updating ´the map with the new boundingBox. This method will be called when loading the page (see onload event). In the method we first check if bbox is not null. In that case we continue with the code. We write the new boundingBox to four JavaScript variables and than call the updateMap method of our JavaScript object (yes, the same as before without any changes). But because we are within the proxy we cannot access the portals base page directly and so first we must reference the proxies direct parent – our module. So we need two parent references! The first from the proxy to the module and the second from the module to the portals base page.
To register the module to a context the same has
to be done as for the module without server side component. In
addition we must ensure that the listener class is in your classpath
(e.g. $iGeoPortal_home$/WEB-INF/classes).
As we have seen there is no magic or at least not much writing new modules for deegree iGeoPortal. All modules share the same interface which may seem to be a bit overdosed for simple modules, but in general it simplifies development and reading/debugging code. So when writing new modules you shall keep this interface. Even if JavaScript allows you to access each instance variable directly (because it is not a real object orientated programming language) you should use the mechanisms described above to avoid inconsistent states of your portal instance.
What kind of modules may be useful? The list is long and we hope somebody may be interested in writing some new modules and publish them to the deegree project. For instance think of the example module we have developed; making some extension like considering different CRS validation of meaningful area etc. could make this an interesting module. A more complex module could allow digitizing geometries and performing a transaction on a WFS. This module is fragmentary implemented meanwhile. Or think of any kind of administration module for WMSs registered to a portal instance. Its just your imagination that limits the list.
$iGeoportal_home$/WEB-INF/conf/igeoportal/wmc_start_utah.xml
<?xml version="1.0" encoding="UTF-8"?>
<ViewContext xmlns="http://www.opengis.net/context" xmlns:sld="http://www.opengis.net/sld"
xmlns:xlink="http://www.w3.org/1999/xlink" xmlns:xsi="http://www.w3.org/2001/XMLSchema-instance"
version="1.0.0" id="String">
<General>
<!-- specifies the map size and must correspond to the module MapView definded further below.
The <BoundingBox ...> sets the used CRS and the initial extend (used for button View full extent)
BBox must have the same proportion as the <Window ...> settings. -->
<Window width="500" height="500" />
<BoundingBox SRS="EPSG:26912" minx="117300" miny="4049850" maxx="767300" maxy="4699850" />
<Title>deegree iGeoPortal</Title>
<KeywordList>
<Keyword>deegree</Keyword>
<Keyword>iGeoPortal</Keyword>
<Keyword>SDI</Keyword>
<Keyword>GDI</Keyword>
<Keyword>lat/lon</Keyword>
<Keyword>utah</Keyword>
</KeywordList>
<DescriptionURL format="text/html">
<OnlineResource xlink:type="simple" xlink:href="http://www.deegree.org" />
</DescriptionURL>
<ContactInformation>
<ContactPersonPrimary>
<ContactPerson>Andreas Poth</ContactPerson>
<ContactOrganization>lat/lon</ContactOrganization>
</ContactPersonPrimary>
<ContactPosition>developer</ContactPosition>
<ContactAddress>
<AddressType>postal</AddressType>
<Address>Aennchenstr. 19</Address>
<City>Bonn</City>
<StateOrProvince>NRW</StateOrProvince>
<PostCode>53177</PostCode>
<Country>Germany</Country>
</ContactAddress>
<ContactVoiceTelephone>++49 228 184960</ContactVoiceTelephone>
<ContactElectronicMailAddress>poth@lat-lon.de</ContactElectronicMailAddress>
</ContactInformation>
<Extension xmlns:deegree="http://www.deegree.org/context">
<deegree:IOSettings>
<deegree:TempDirectory>
<deegree:Name>../../../tmp</deegree:Name>
<deegree:Access>
<OnlineResource xlink:type="simple"
xlink:href="http://localhost:8080/igeoportal-std" />
</deegree:Access>
</deegree:TempDirectory>
<!-- <deegree:DownloadDirectory>
<deegree:Name>../../../print</deegree:Name>
<deegree:Access>
<OnlineResource xlink:type="simple"
xlink:href="http://localhost:8080/igeoportal-std/" />
</deegree:Access>
</deegree:DownloadDirectory>-->
<deegree:SLDDirectory>
<deegree:Name>../../../</deegree:Name>
<deegree:Access>
<OnlineResource xlink:type="simple"
xlink:href="http://localhost:8080/igeoportal-std" />
</deegree:Access>
</deegree:SLDDirectory>
<deegree:PrintDirectory>
<deegree:Name>../../../print</deegree:Name>
<deegree:Access>
<OnlineResource xlink:type="simple"
xlink:href="http://localhost:8080/igeoportal-std/print" />
</deegree:Access>
</deegree:PrintDirectory>
</deegree:IOSettings>
<deegree:Frontend scope="JSP">
<deegree:Controller>./modules/controller/controller.jsp</deegree:Controller>
<deegree:Style>./css/deegree.css</deegree:Style>
<deegree:Header>header.html</deegree:Header>
<deegree:Footer>footer.html</deegree:Footer>
<deegree:CommonJS>
<deegree:Name>event.js</deegree:Name>
<deegree:Name>envelope.js</deegree:Name>
<deegree:Name>geotransform.js</deegree:Name>
<deegree:Name>pushbutton.js</deegree:Name>
<deegree:Name>togglebutton.js</deegree:Name>
<deegree:Name>layergroup.js</deegree:Name>
<deegree:Name>htmllayer.js</deegree:Name>
<deegree:Name>layerutils.js</deegree:Name>
<deegree:Name>rpc.js</deegree:Name>
<deegree:Name>recentertolayer.js</deegree:Name>
</deegree:CommonJS>
<!-- NORTH -->
<deegree:North hidden="false">
<deegree:Module hidden="false" type="content" width="990" height="35">
<deegree:Name>MenuBarTop</deegree:Name>
<deegree:Content>menubartop.html</deegree:Content>
<deegree:ModuleJS>menubar.js</deegree:ModuleJS>
</deegree:Module>
</deegree:North>
<!-- EAST -->
<deegree:East hidden="false">
<deegree:Module hidden="false" type="content" width="150" height="50">
<deegree:Name>ContextSwitcher</deegree:Name>
<deegree:Content>contextswitcher.html</deegree:Content>
<deegree:ModuleJS>contextswitcher.js</deegree:ModuleJS>
<deegree:ParameterList>
<deegree:Parameter>
<deegree:Name>label</deegree:Name>
<deegree:Value>'Theme selection:'</deegree:Value>
</deegree:Parameter>
<deegree:Parameter>
<deegree:Name>listOfContexts</deegree:Name>
<!--
If you want to test cswClientModule, digitizerModule, gazetteerClient, securityEnabledPortal switch to second <deegree:Value> entry.
-->
<deegree:Value>'Utah|wmc_start_utah.xml;Salt Lake City|wmc_saltlake.xml'</deegree:Value>
<!-- <deegree:Value>'Utah|wmc_start_utah.xml;Salt Lake City|wmc_saltlake.xml;Europe|mapcontext1.xml;North America|wmc_north_america.xml;Canada|wmc_canada_dmsg.xml;TestDigitizer|wmc_testDigitizer.xml;TestGaz|wmc_testGazClient.xml;TestSecurity|wmc_testSecurity.xml;TestCSW|wmc_testCswClient.xml'</deegree:Value> -->
<!-- WARNING: TestCSW is not working yet !!! -->
</deegree:Parameter>
<deegree:Parameter>
<deegree:Name>size</deegree:Name>
<deegree:Value>1</deegree:Value>
</deegree:Parameter>
<deegree:Parameter>
<deegree:Name>bgcolor</deegree:Name>
<deegree:Value>'#cccccc'</deegree:Value>
</deegree:Parameter>
</deegree:ParameterList>
</deegree:Module>
<deegree:Module hidden="false" type="content" width="150" height="40">
<deegree:Name>DefaultContentSwitch</deegree:Name>
<deegree:Content>defaultcontentswitch.html</deegree:Content>
<deegree:ModuleJS>contentswitch.js</deegree:ModuleJS>
<deegree:ParameterList>
<deegree:Parameter>
<deegree:Name>targetIFrame</deegree:Name>
<deegree:Value>'LayerListView'</deegree:Value>
</deegree:Parameter>
<deegree:Parameter>
<deegree:Name>sourceModules</deegree:Name>
<deegree:Value>
'LayerListView|layerlistview.html;Legend|legend.html'
</deegree:Value>
</deegree:Parameter>
</deegree:ParameterList>
</deegree:Module>
<deegree:Module hidden="true" type="content" width="250" height="460">
<deegree:Name>Legend</deegree:Name>
<deegree:Content>legend.html</deegree:Content>
<deegree:ModuleJS>legend.js</deegree:ModuleJS>
<deegree:ParameterList>
<deegree:Parameter>
<deegree:Name>label</deegree:Name>
<deegree:Value>'Legend'</deegree:Value>
</deegree:Parameter>
<deegree:Parameter>
<deegree:Name>bgcolor</deegree:Name>
<deegree:Value>'#cccccc'</deegree:Value>
</deegree:Parameter>
<deegree:Parameter>
<deegree:Name>layerlist</deegree:Name>
<deegree:Value>this.layerList</deegree:Value>
</deegree:Parameter>
<deegree:Parameter>
<deegree:Name>width</deegree:Name>
<deegree:Value>20</deegree:Value>
</deegree:Parameter>
<deegree:Parameter>
<deegree:Name>height</deegree:Name>
<deegree:Value>20</deegree:Value>
</deegree:Parameter>
</deegree:ParameterList>
</deegree:Module>
<deegree:Module hidden="false" type="content" width="250" height="460">
<deegree:Name>LayerListView</deegree:Name>
<deegree:Content>layerlistview.html</deegree:Content>
<deegree:ModuleJS>layerlist.js</deegree:ModuleJS>
<deegree:ModuleJS>layerlistview.js</deegree:ModuleJS>
<!-- alternative layerlistview with feature infos for all visible layers: -->
<!--
<deegree:ModuleJS>layerlistview_allfi.js</deegree:ModuleJS>
-->
<deegree:ParameterList>
<deegree:Parameter>
<deegree:Name>name</deegree:Name>
<deegree:Value>'layerlistview'</deegree:Value>
</deegree:Parameter>
<deegree:Parameter>
<deegree:Name>layerlist</deegree:Name>
<deegree:Value>this.layerList</deegree:Value>
</deegree:Parameter>
<deegree:Parameter>
<deegree:Name>label</deegree:Name>
<deegree:Value>'Utah'</deegree:Value>
</deegree:Parameter>
<deegree:Parameter>
<deegree:Name>bgcolor</deegree:Name>
<deegree:Value>'#cccccc'</deegree:Value>
</deegree:Parameter>
<deegree:Parameter>
<deegree:Name>fgcolor</deegree:Name>
<deegree:Value>'#aaaaaa'</deegree:Value>
</deegree:Parameter>
</deegree:ParameterList>
</deegree:Module>
</deegree:East>
<!-- SOUTH -->
<deegree:South hidden="false">
<deegree:Module hidden="false" type="content" width="300" height="20">
<deegree:Name>CoordinateDisplay</deegree:Name>
<deegree:Content>coordinatedisplay.html</deegree:Content>
<deegree:ModuleJS>coordinatedisplay.js</deegree:ModuleJS>
<deegree:ParameterList>
<deegree:Parameter>
<deegree:Name>digits</deegree:Name>
<deegree:Value>3</deegree:Value>
</deegree:Parameter>
<deegree:Parameter>
<deegree:Name>labelX</deegree:Name>
<deegree:Value>'lon:'</deegree:Value>
</deegree:Parameter>
<deegree:Parameter>
<deegree:Name>labelY</deegree:Name>
<deegree:Value>'lat:'</deegree:Value>
</deegree:Parameter>
</deegree:ParameterList>
</deegree:Module>
<deegree:Module hidden="false" type="content" width="685" height="20">
<deegree:Name>MenuBarBottom</deegree:Name>
<deegree:Content>menubarbottom.html</deegree:Content>
<deegree:ModuleJS>menubar.js</deegree:ModuleJS>
</deegree:Module>
</deegree:South>
<!-- WEST -->
<deegree:West hidden="false">
<deegree:Module hidden="false" type="content" width="150" height="150"
scrolling="no">
<deegree:Name>MapOverview</deegree:Name>
<deegree:Content>mapoverview.html</deegree:Content>
<deegree:ModuleJS>mapoverview.js</deegree:ModuleJS>
<deegree:ModuleJS>wz_jsgraphics_box.js</deegree:ModuleJS>
<deegree:ParameterList>
<deegree:Parameter>
<deegree:Name>src</deegree:Name>
<deegree:Value>'./images/overview_utah.gif'</deegree:Value>
</deegree:Parameter>
<deegree:Parameter>
<deegree:Name>minx</deegree:Name>
<deegree:Value>161923</deegree:Value>
</deegree:Parameter>
<deegree:Parameter>
<deegree:Name>miny</deegree:Name>
<deegree:Value>4094621</deegree:Value>
</deegree:Parameter>
<deegree:Parameter>
<deegree:Name>maxx</deegree:Name>
<deegree:Value>725119</deegree:Value>
</deegree:Parameter>
<deegree:Parameter>
<deegree:Name>maxy</deegree:Name>
<deegree:Value>4657817</deegree:Value>
</deegree:Parameter>
<deegree:Parameter>
<deegree:Name>foregroundColor</deegree:Name>
<deegree:Value>'#ff0000'</deegree:Value>
</deegree:Parameter>
<deegree:Parameter>
<deegree:Name>width</deegree:Name>
<deegree:Value>150</deegree:Value>
</deegree:Parameter>
<deegree:Parameter>
<deegree:Name>height</deegree:Name>
<deegree:Value>150</deegree:Value>
</deegree:Parameter>
</deegree:ParameterList>
</deegree:Module>
<!--
<deegree:Module hidden="false" type="content" height="150" width="150">
<deegree:Name>BBoxInput1</deegree:Name>
<deegree:Content>bboxinput1.html</deegree:Content>
<deegree:ModuleJS>bboxinput1.js</deegree:ModuleJS>
</deegree:Module>
-->
<deegree:Module hidden="false" type="content" width="150" height="50">
<deegree:Name>ScaleSwitcher</deegree:Name>
<deegree:Content>scaleswitcher.html</deegree:Content>
<deegree:ModuleJS>scaleswitcher.js</deegree:ModuleJS>
<deegree:ParameterList>
<deegree:Parameter>
<deegree:Name>label</deegree:Name>
<deegree:Value>'Scale:'</deegree:Value>
</deegree:Parameter>
<deegree:Parameter>
<deegree:Name>listOfScales</deegree:Name>
<deegree:Value>
'1:100;1:5000;1:10000;1:25000;1:50000;1:100000;1:500000;1:1000000;1:5000000'
</deegree:Value>
</deegree:Parameter>
<deegree:Parameter>
<deegree:Name>listSize</deegree:Name>
<deegree:Value>1</deegree:Value>
</deegree:Parameter>
<deegree:Parameter>
<deegree:Name>bgcolor</deegree:Name>
<deegree:Value>'#cccccc'</deegree:Value>
</deegree:Parameter>
</deegree:ParameterList>
</deegree:Module>
<!-- NEW GAZETTEER WFS MODULE -->
<deegree:Module hidden="false" type="content" height="50" scrolling="no">
<deegree:Name>GazModule</deegree:Name>
<deegree:Content>modules/gazetteer/gazmodule.html</deegree:Content>
<deegree:ModuleJS>modules/gazetteer/gazmodule.js</deegree:ModuleJS>
<deegree:ParameterList>
<!-- gaz_a.jsp: county - municipality -->
<deegree:Parameter>
<deegree:Name>countyTemplate</deegree:Name>
<deegree:Value>'WEB-INF/conf/igeoportal/querytemplates/a_county_query.xml'</deegree:Value>
</deegree:Parameter>
<deegree:Parameter>
<deegree:Name>countyMapTemplate</deegree:Name>
<deegree:Value>'WEB-INF/conf/igeoportal/querytemplates/a_countyMap_query.xml'</deegree:Value>
</deegree:Parameter>
<deegree:Parameter>
<deegree:Name>municipalityTemplate</deegree:Name>
<deegree:Value>'WEB-INF/conf/igeoportal/querytemplates/a_municipality_query.xml'</deegree:Value>
</deegree:Parameter>
<deegree:Parameter>
<deegree:Name>municipalityMapTemplate</deegree:Name>
<deegree:Value>'WEB-INF/conf/igeoportal/querytemplates/a_municipalityMap_query.xml'</deegree:Value>
</deegree:Parameter>
<!-- WFS addresses -->
<deegree:Parameter>
<deegree:Name>WFS</deegree:Name>
<!-- <deegree:Value>'http://some.where:8080/deegree2/services'</deegree:Value> -->
<deegree:Value>'http://demo.deegree.org/deegree-wfs/services'</deegree:Value>
</deegree:Parameter>
</deegree:ParameterList>
</deegree:Module>
<deegree:Module hidden="false" type="content" height="160">
<deegree:Name>Spacer</deegree:Name>
<deegree:Content>spacer.html</deegree:Content>
</deegree:Module>
<deegree:Module hidden="false" type="content" width="180" height="180">
<deegree:Name>Note</deegree:Name>
<deegree:Content>note.html</deegree:Content>
<deegree:ModuleJS>dummy.js</deegree:ModuleJS>
</deegree:Module>
</deegree:West>
<!-- CENTER -->
<deegree:Center hidden="false">
<deegree:Module hidden="false" type="toolbar" width="450" height="35">
<deegree:Name>Toolbar</deegree:Name>
<deegree:Content>toolbar.html</deegree:Content>
<deegree:ModuleJS>toolbar.js</deegree:ModuleJS>
<deegree:ModuleJS>buttongroup.js</deegree:ModuleJS>
<deegree:ParameterList>
<deegree:Parameter>
<deegree:Name>refresh|refresh map</deegree:Name>
<deegree:Value>PushButton</deegree:Value>
</deegree:Parameter>
<deegree:Parameter>
<deegree:Name>fullextent|zoom to full extent</deegree:Name>
<deegree:Value>PushButton</deegree:Value>
</deegree:Parameter>
<deegree:Parameter>
<deegree:Name>movetoprevious|move to previous map</deegree:Name>
<deegree:Value>PushButton</deegree:Value>
</deegree:Parameter>
<deegree:Parameter>
<deegree:Name>movetonext|next to previous map</deegree:Name>
<deegree:Value>PushButton</deegree:Value>
</deegree:Parameter>
<deegree:Parameter>
<deegree:Name>zoomin|zoomin by mouse click or mouse drag</deegree:Name>
<deegree:Value>ToggleButton</deegree:Value>
</deegree:Parameter>
<deegree:Parameter>
<deegree:Name>zoomout|zoomout by mouse click</deegree:Name>
<deegree:Value>ToggleButton</deegree:Value>
</deegree:Parameter>
<!-- zoom2layer: make sure, the WMS supports proper BBoxes and scale hints for the requested layer as these are used to zoom to. Refer Documentation for details -->
<!--
<deegree:Parameter>
<deegree:Name>zoom2layer|zoomtolayer by mouse click</deegree:Name>
<deegree:Value>PushButton</deegree:Value>
</deegree:Parameter>
-->
<deegree:Parameter>
<deegree:Name>featureinfo|get info to a object within the map</deegree:Name>
<deegree:Value>ToggleButton</deegree:Value>
</deegree:Parameter>
<deegree:Parameter>
<deegree:Name>recenter|recenter the map by mouse click</deegree:Name>
<deegree:Value>ToggleButton</deegree:Value>
</deegree:Parameter>
<deegree:Parameter>
<deegree:Name>move|drag the map by mouse with pressed mouse button</deegree:Name>
<deegree:Value>ToggleButton</deegree:Value>
</deegree:Parameter>
<deegree:Parameter>
<deegree:Name>addwms|add additonal WMS to the map</deegree:Name>
<deegree:Value>PushButton</deegree:Value>
</deegree:Parameter>
<deegree:Parameter>
<deegree:Name>print|generate print view</deegree:Name>
<deegree:Value>PushButton</deegree:Value>
</deegree:Parameter>
<deegree:Parameter>
<deegree:Name>bgcolor</deegree:Name>
<deegree:Value>'#E9E9E9'</deegree:Value>
</deegree:Parameter>
<!--
<deegree:Parameter>
<deegree:Name>selected</deegree:Name>
<deegree:Value>zoomin</deegree:Value>
</deegree:Parameter>
-->
</deegree:ParameterList>
</deegree:Module>
<deegree:Module hidden="false" type="content" width="550" height="550"
scrolling="no">
<deegree:Name>MapView</deegree:Name>
<deegree:Content>mapview.html</deegree:Content>
<deegree:ModuleJS>mapview.js</deegree:ModuleJS>
<deegree:ModuleJS>mapcontroller.js</deegree:ModuleJS>
<deegree:ModuleJS>mapmodel.js</deegree:ModuleJS>
<deegree:ModuleJS>wmsrequestfactory.js</deegree:ModuleJS>
<deegree:ModuleJS>wmslayer.js</deegree:ModuleJS>
<deegree:ParameterList>
<deegree:Parameter>
<deegree:Name>model</deegree:Name>
<deegree:Value>this.mapModel</deegree:Value>
</deegree:Parameter>
<deegree:Parameter>
<deegree:Name>border</deegree:Name>
<deegree:Value>0</deegree:Value>
</deegree:Parameter>
</deegree:ParameterList>
</deegree:Module>
<!--
<deegree:Module hidden="false" type="content" height="550" width="550" scrolling="no">
<deegree:Name>ScaleBarSwitcher</deegree:Name>
<deegree:Content>scalebarswitcher.html</deegree:Content>
<deegree:ModuleJS>scalebarswitcher.js</deegree:ModuleJS>
<deegree:ParameterList>
<deegree:Parameter>
<deegree:Name>scaleBarValues</deegree:Name>
<deegree:Value>'10;50;100;200;250;300;350;400;500;600;700;1000;1500'</deegree:Value>
</deegree:Parameter>
<deegree:Parameter>
<deegree:Name>unit</deegree:Name>
<deegree:Value>'km'</deegree:Value>
</deegree:Parameter>
</deegree:ParameterList>
</deegree:Module>
-->
</deegree:Center>
</deegree:Frontend>
<!-- NOTE: currently, the deegree:MapParameter are not evaluated -->
<deegree:MapParameter>
<!--
list of formats offered to the user for GetFeatureInfo requests. The administrator of the WMS client have make sure that each WMS that is registered to the client is able the serve the offered formats default = text/html
-->
<deegree:OfferedInfoFormats>
<deegree:Format>application/vnd.ogc.gml</deegree:Format>
<deegree:Format selected="true">text/html</deegree:Format>
</deegree:OfferedInfoFormats>
<!--
list of available factors (%) a map will be increased, descreased by a zoom operation. The value '*' indicates that the user will have the option to choose any value he likes
-->
<deegree:OfferedZoomFactor>
<deegree:Factor selected="true">25</deegree:Factor>
</deegree:OfferedZoomFactor>
<!--
list of available factors (%) a map will be moved by a pan operation The value '*' indicates that the user will have the option to choose any value he likes
-->
<deegree:OfferedPanFactor>
<deegree:Factor selected="true">15</deegree:Factor>
</deegree:OfferedPanFactor>
<!--
minimum scale (as defined by the WMS spec) to which the map can be zoomed in deafult = 1 m
-->
<deegree:MinScale>1</deegree:MinScale>
<!--
maximum scale (as defined by the WMS spec) to which the map can be zoomed out deafult = 100000 m
-->
<deegree:MaxScale>100000</deegree:MaxScale>
</deegree:MapParameter>
</Extension>
</General>
<LayerList>
<!-- queryable="1" specifies, whether or not this layer is queryable via WMS GeFeatureInfo. hdden="1" defines if the layer is visable at start of this context -->
<Layer queryable="1" hidden="1">
<!-- service="OGC:WMS" version="1.1.1"principally iGeoportal is also capable of requesting WFS; this feaure is not usable yet. The title="deegree2.2 Demo WMS" must be unique for every requested WMS, in case you configure more than one WMS xlink:href specifies the online resource of the service-->
<Server service="OGC:WMS" version="1.1.1" title="deegree2.2 Demo WMS">
<OnlineResource xlink:type="simple"
xlink:href="http://demo.deegree.org/deegree-wms/services?" />
</Server>
<!--<Name> must the WMS name -->
<Name>Springs</Name>
<!-- Title can be chosen freely and should be human readable -->
<Title>Springs</Title>
<!-- Specifies the requested CRS to the WMS. Should be identical to the Web Map Context (WMC) configuration -->
<SRS>EPSG:26912</SRS>
<FormatList>
<!-- sets the requested image format. Must be offered by WMS -->
<Format current="1">image/png</Format>
</FormatList>
<StyleList>
<Style current="1">
<!-- set the style to be used. Must be offered by WMS -->
<Name>default</Name>
<Title>default</Title>
</Style>
</StyleList>
<Extension xmlns:deegree="http://www.deegree.org/context">
<deegree:MasterLayer>false</deegree:MasterLayer>
</Extension>
</Layer>
<Layer queryable="1" hidden="1">
<Server service="OGC:WMS" version="1.1.1" title="deegree2.2 Demo WMS">
<OnlineResource xlink:type="simple"
xlink:href="http://demo.deegree.org/deegree-wms/services?" />
</Server>
<Name>Airports</Name>
<Title>Airports</Title>
<SRS>EPSG:26912</SRS>
<FormatList>
<Format current="1">image/png</Format>
</FormatList>
<StyleList>
<Style current="1">
<Name>default</Name>
<Title>default</Title>
</Style>
</StyleList>
<Extension xmlns:deegree="http://www.deegree.org/context">
<deegree:MasterLayer>false</deegree:MasterLayer>
</Extension>
</Layer>
<Layer queryable="1" hidden="0">
<Server service="OGC:WMS" version="1.1.1" title="deegree2.2 Demo WMS">
<OnlineResource xlink:type="simple"
xlink:href="http://demo.deegree.org/deegree-wms/services?" />
</Server>
<Name>Lake</Name>
<Title>Lakes</Title>
<SRS>EPSG:26912</SRS>
<FormatList>
<Format current="1">image/png</Format>
</FormatList>
<StyleList>
<Style current="1">
<Name>default</Name>
<Title>default</Title>
</Style>
</StyleList>
<Extension xmlns:deegree="http://www.deegree.org/context">
<deegree:MasterLayer>false</deegree:MasterLayer>
</Extension>
</Layer>
<Layer queryable="1" hidden="1">
<Server service="OGC:WMS" version="1.1.1" title="deegree2.2 Demo WMS">
<OnlineResource xlink:type="simple"
xlink:href="http://demo.deegree.org/deegree-wms/services?" />
</Server>
<Name>Vegetation</Name>
<Title>Vegetation</Title>
<SRS>EPSG:26912</SRS>
<FormatList>
<Format current="1">image/png</Format>
</FormatList>
<StyleList>
<Style current="1">
<Name>default</Name>
<Title>default</Title>
</Style>
</StyleList>
<Extension xmlns:deegree="http://www.deegree.org/context">
<deegree:MasterLayer>false</deegree:MasterLayer>
</Extension>
</Layer>
<Layer queryable="1" hidden="1">
<Server service="OGC:WMS" version="1.1.1" title="deegree2.2 Demo WMS">
<OnlineResource xlink:type="simple"
xlink:href="http://demo.deegree.org/deegree-wms/services?" />
</Server>
<Name>EnergyResources</Name>
<Title>Energy Resources</Title>
<SRS>EPSG:26912</SRS>
<FormatList>
<Format current="1">image/png</Format>
</FormatList>
<StyleList>
<Style current="1">
<Name>default</Name>
<Title>default</Title>
</Style>
</StyleList>
<Extension xmlns:deegree="http://www.deegree.org/context">
<deegree:MasterLayer>false</deegree:MasterLayer>
</Extension>
</Layer>
<Layer queryable="1" hidden="1">
<Server service="OGC:WMS" version="1.1.1" title="deegree2.2 Demo WMS">
<OnlineResource xlink:type="simple"
xlink:href="http://demo.deegree.org/deegree-wms/services?" />
</Server>
<Name>ElevationContours</Name>
<Title>Elevation Contours</Title>
<SRS>EPSG:26912</SRS>
<FormatList>
<Format current="1">image/png</Format>
</FormatList>
<StyleList>
<Style current="1">
<Name>default</Name>
<Title>default</Title>
</Style>
</StyleList>
<Extension xmlns:deegree="http://www.deegree.org/context">
<deegree:MasterLayer>false</deegree:MasterLayer>
</Extension>
</Layer>
<Layer queryable="1" hidden="1">
<Server service="OGC:WMS" version="1.1.1" title="deegree2.2 Demo WMS">
<OnlineResource xlink:type="simple"
xlink:href="http://demo.deegree.org/deegree-wms/services?" />
</Server>
<Name>Railroads</Name>
<Title>Railroads</Title>
<SRS>EPSG:26912</SRS>
<FormatList>
<Format current="1">image/png</Format>
</FormatList>
<StyleList>
<Style current="1">
<Name>default</Name>
<Title>default</Title>
</Style>
</StyleList>
<Extension xmlns:deegree="http://www.deegree.org/context">
<deegree:MasterLayer>false</deegree:MasterLayer>
</Extension>
</Layer>
<Layer queryable="1" hidden="1">
<Server service="OGC:WMS" version="1.1.1" title="deegree2.2 Demo WMS">
<OnlineResource xlink:type="simple"
xlink:href="http://demo.deegree.org/deegree-wms/services?" />
</Server>
<Name>Roads</Name>
<Title>Roads</Title>
<SRS>EPSG:26912</SRS>
<FormatList>
<Format current="1">image/png</Format>
</FormatList>
<StyleList>
<Style current="1">
<Name>default</Name>
<Title>default</Title>
<!--Name>default</Name>
<Title>default</Title-->
</Style>
</StyleList>
<Extension xmlns:deegree="http://www.deegree.org/context">
<deegree:MasterLayer>false</deegree:MasterLayer>
</Extension>
</Layer>
<Layer queryable="1" hidden="0">
<Server service="OGC:WMS" version="1.1.1" title="deegree2.2 Demo WMS">
<OnlineResource xlink:type="simple"
xlink:href="http://demo.deegree.org/deegree-wms/services?" />
</Server>
<Name>Municipalities</Name>
<Title>Municipalities</Title>
<SRS>EPSG:26912</SRS>
<FormatList>
<Format current="1">image/png</Format>
</FormatList>
<StyleList>
<Style current="1">
<Name>default</Name>
<Title>default</Title>
</Style>
</StyleList>
<Extension xmlns:deegree="http://www.deegree.org/context">
<deegree:MasterLayer>false</deegree:MasterLayer>
</Extension>
</Layer>
<Layer queryable="1" hidden="1">
<Server service="OGC:WMS" version="1.1.1" title="deegree2.2 Demo WMS">
<OnlineResource xlink:type="simple"
xlink:href="http://demo.deegree.org/deegree-wms/services?" />
</Server>
<Name>Counties</Name>
<Title>County Boundary</Title>
<SRS>EPSG:26912</SRS>
<FormatList>
<Format current="1">image/png</Format>
</FormatList>
<StyleList>
<Style current="1">
<Name>default</Name>
<Title>default</Title>
</Style>
</StyleList>
<Extension xmlns:deegree="http://www.deegree.org/context">
<deegree:MasterLayer>false</deegree:MasterLayer>
</Extension>
</Layer>
<Layer queryable="1" hidden="1">
<Server service="OGC:WMS" version="1.1.1" title="deegree2.2 Demo WMS">
<OnlineResource xlink:type="simple"
xlink:href="http://demo.deegree.org/deegree-wms/services?" />
</Server>
<Name>StateBoundary</Name>
<Title>State Boundary</Title>
<SRS>EPSG:26912</SRS>
<FormatList>
<Format current="1">image/png</Format>
</FormatList>
<StyleList>
<Style current="1">
<Name>default</Name>
<Title>default</Title>
</Style>
</StyleList>
<Extension xmlns:deegree="http://www.deegree.org/context">
<deegree:MasterLayer>false</deegree:MasterLayer>
</Extension>
</Layer>
<Layer queryable="1" hidden="1">
<Server service="OGC:WMS" version="1.1.1" title="deegree2.2 Demo WMS">
<OnlineResource xlink:type="simple"
xlink:href="http://demo.deegree.org/deegree-wms/services?" />
</Server>
<Name>StateOverview</Name>
<Title>State Overview</Title>
<SRS>EPSG:26912</SRS>
<FormatList>
<Format current="1">image/png</Format>
</FormatList>
<StyleList>
<Style current="1">
<Name>default</Name>
<Title>default</Title>
</Style>
</StyleList>
<Extension xmlns:deegree="http://www.deegree.org/context">
<deegree:MasterLayer>false</deegree:MasterLayer>
</Extension>
</Layer>
<Layer queryable="1" hidden="1">
<Server service="OGC:WMS" version="1.1.1" title="deegree2.2 Demo WMS">
<OnlineResource xlink:type="simple"
xlink:href="http://demo.deegree.org/deegree-wms/services?" />
</Server>
<Name>ZipCodes</Name>
<Title>ZipCodes</Title>
<SRS>EPSG:26912</SRS>
<FormatList>
<Format current="1">image/png</Format>
</FormatList>
<StyleList>
<Style current="1">
<Name>default</Name>
<Title>default</Title>
</Style>
</StyleList>
<Extension xmlns:deegree="http://www.deegree.org/context">
<deegree:MasterLayer>false</deegree:MasterLayer>
</Extension>
</Layer>
<Layer queryable="1" hidden="0">
<Server service="OGC:WMS" version="1.1.1" title="deegree2.2 Demo WMS">
<OnlineResource xlink:type="simple"
xlink:href="http://demo.deegree.org/deegree-wms/services?" />
</Server>
<Name>ZipCodes</Name>
<Title>ZipCodes Population</Title>
<SRS>EPSG:26912</SRS>
<FormatList>
<Format current="1">image/png</Format>
</FormatList>
<StyleList>
<Style current="1">
<Name>ZipCodesPop</Name>
<Title>ZipCodesPop</Title>
</Style>
</StyleList>
<Extension xmlns:deegree="http://www.deegree.org/context">
<deegree:MasterLayer>false</deegree:MasterLayer>
</Extension>
</Layer>
</LayerList>
</ViewContext>
$iGeoportal_home$/WEB-INF/conf/igeoportal/wmc_testCswClient.xml
<?xml version="1.0" encoding="UTF-8"?>
<ViewContext xmlns="http://www.opengis.net/context" xmlns:sld="http://www.opengis.net/sld"
xmlns:xlink="http://www.w3.org/1999/xlink" xmlns:xsi="http://www.w3.org/2001/XMLSchema-instance"
version="1.0.0" id="String">
<General>
<Window width="500" height="500" />
<BoundingBox SRS="EPSG:26912" minx="117300" miny="4049850" maxx="767300" maxy="4699850" />
<Title>deegree iGeoPortal</Title>
<KeywordList>
<Keyword>deegree</Keyword>
<Keyword>iGeoPortal</Keyword>
<Keyword>SDI</Keyword>
<Keyword>GDI</Keyword>
<Keyword>lat/lon</Keyword>
<Keyword>csw</Keyword>
</KeywordList>
<DescriptionURL format="text/html">
<OnlineResource xlink:type="simple" xlink:href="http://www.deegree.org" />
</DescriptionURL>
<ContactInformation>
<ContactPersonPrimary>
<ContactPerson>Andreas Poth</ContactPerson>
<ContactOrganization>lat/lon</ContactOrganization>
</ContactPersonPrimary>
<ContactPosition>developer</ContactPosition>
<ContactAddress>
<AddressType>postal</AddressType>
<Address>Aennchenstr. 19</Address>
<City>Bonn</City>
<StateOrProvince>NRW</StateOrProvince>
<PostCode>53177</PostCode>
<Country>Germany</Country>
</ContactAddress>
<ContactVoiceTelephone>++49 228 184960</ContactVoiceTelephone>
<ContactElectronicMailAddress>poth@lat-lon.de</ContactElectronicMailAddress>
</ContactInformation>
<Extension xmlns:deegree="http://www.deegree.org/context">
<deegree:IOSettings>
<deegree:TempDirectory>
<deegree:Name>../../../tmp</deegree:Name>
<deegree:Access>
<OnlineResource xlink:type="simple"
xlink:href="http://localhost:8080/igeoportal-std" />
</deegree:Access>
</deegree:TempDirectory>
<deegree:SLDDirectory>
<deegree:Name>../../../</deegree:Name>
<deegree:Access>
<OnlineResource xlink:type="simple"
xlink:href="http://localhost:8080/igeoportal-std" />
</deegree:Access>
</deegree:SLDDirectory>
<deegree:PrintDirectory>
<deegree:Name>../../../print</deegree:Name>
<deegree:Access>
<OnlineResource xlink:type="simple"
xlink:href="http://localhost:8080/igeoportal-std/print" />
</deegree:Access>
</deegree:PrintDirectory>
</deegree:IOSettings>
<deegree:Frontend scope="JSP">
<deegree:Controller>./modules/controller/controller.jsp</deegree:Controller>
<deegree:Style>./css/deegree.css</deegree:Style>
<deegree:Header>header.html</deegree:Header>
<deegree:Footer>footer.html</deegree:Footer>
<deegree:CommonJS>
<deegree:Name>event.js</deegree:Name>
<deegree:Name>envelope.js</deegree:Name>
<deegree:Name>geotransform.js</deegree:Name>
<deegree:Name>pushbutton.js</deegree:Name>
<deegree:Name>togglebutton.js</deegree:Name>
<deegree:Name>layergroup.js</deegree:Name>
<deegree:Name>htmllayer.js</deegree:Name>
<deegree:Name>layerutils.js</deegree:Name>
<deegree:Name>rpc.js</deegree:Name>
</deegree:CommonJS>
<!-- NORTH -->
<deegree:North hidden="false">
<deegree:Module hidden="false" type="content" width="990" height="35">
<deegree:Name>MenuBarTop</deegree:Name>
<deegree:Content>menubartop.html</deegree:Content>
<deegree:ModuleJS>menubar.js</deegree:ModuleJS>
</deegree:Module>
</deegree:North>
<!-- EAST -->
<deegree:East hidden="false">
<deegree:Module hidden="false" type="content" width="150" height="50">
<deegree:Name>ContextSwitcher</deegree:Name>
<deegree:Content>contextswitcher.html</deegree:Content>
<deegree:ModuleJS>contextswitcher.js</deegree:ModuleJS>
<deegree:ParameterList>
<deegree:Parameter>
<deegree:Name>label</deegree:Name>
<deegree:Value>'Theme selection:'</deegree:Value>
</deegree:Parameter>
<deegree:Parameter>
<deegree:Name>listOfContexts</deegree:Name>
<deegree:Value>'TestCSW|wmc_testCswClient.xml;Utah|wmc_start_utah.xml;'</deegree:Value>
</deegree:Parameter>
<deegree:Parameter>
<deegree:Name>size</deegree:Name>
<deegree:Value>1</deegree:Value>
</deegree:Parameter>
<deegree:Parameter>
<deegree:Name>bgcolor</deegree:Name>
<deegree:Value>'#cccccc'</deegree:Value>
</deegree:Parameter>
</deegree:ParameterList>
</deegree:Module>
<deegree:Module hidden="false" type="content" width="150" height="40">
<deegree:Name>DefaultContentSwitch</deegree:Name>
<deegree:Content>defaultcontentswitch.html</deegree:Content>
<deegree:ModuleJS>contentswitch.js</deegree:ModuleJS>
<deegree:ParameterList>
<deegree:Parameter>
<deegree:Name>targetIFrame</deegree:Name>
<deegree:Value>'LayerListView'</deegree:Value>
</deegree:Parameter>
<deegree:Parameter>
<deegree:Name>sourceModules</deegree:Name>
<deegree:Value>'LayerListView|layerlistview.html;Legend|legend.html'
</deegree:Value>
</deegree:Parameter>
</deegree:ParameterList>
</deegree:Module>
<deegree:Module hidden="true" type="content" width="250" height="460">
<deegree:Name>Legend</deegree:Name>
<deegree:Content>legend.html</deegree:Content>
<deegree:ModuleJS>legend.js</deegree:ModuleJS>
<deegree:ParameterList>
<deegree:Parameter>
<deegree:Name>label</deegree:Name>
<deegree:Value>'Legend'</deegree:Value>
</deegree:Parameter>
<deegree:Parameter>
<deegree:Name>bgcolor</deegree:Name>
<deegree:Value>'#cccccc'</deegree:Value>
</deegree:Parameter>
<deegree:Parameter>
<deegree:Name>layerlist</deegree:Name>
<deegree:Value>this.layerList</deegree:Value>
</deegree:Parameter>
<deegree:Parameter>
<deegree:Name>width</deegree:Name>
<deegree:Value>20</deegree:Value>
</deegree:Parameter>
<deegree:Parameter>
<deegree:Name>height</deegree:Name>
<deegree:Value>20</deegree:Value>
</deegree:Parameter>
</deegree:ParameterList>
</deegree:Module>
<deegree:Module hidden="false" type="content" width="250" height="460">
<deegree:Name>LayerListView</deegree:Name>
<deegree:Content>layerlistview.html</deegree:Content>
<deegree:ModuleJS>layerlist.js</deegree:ModuleJS>
<deegree:ModuleJS>layerlistview.js</deegree:ModuleJS>
<deegree:ParameterList>
<deegree:Parameter>
<deegree:Name>name</deegree:Name>
<deegree:Value>'layerlistview'</deegree:Value>
</deegree:Parameter>
<deegree:Parameter>
<deegree:Name>layerlist</deegree:Name>
<deegree:Value>this.layerList</deegree:Value>
</deegree:Parameter>
<deegree:Parameter>
<deegree:Name>label</deegree:Name>
<deegree:Value>'Utah'</deegree:Value>
</deegree:Parameter>
<deegree:Parameter>
<deegree:Name>bgcolor</deegree:Name>
<deegree:Value>'#cccccc'</deegree:Value>
</deegree:Parameter>
<deegree:Parameter>
<deegree:Name>fgcolor</deegree:Name>
<deegree:Value>'#aaaaaa'</deegree:Value>
</deegree:Parameter>
</deegree:ParameterList>
</deegree:Module>
</deegree:East>
<!-- SOUTH -->
<deegree:South hidden="false">
<deegree:Module hidden="false" type="content" width="300" height="20">
<deegree:Name>CoordinateDisplay</deegree:Name>
<deegree:Content>coordinatedisplay.html</deegree:Content>
<deegree:ModuleJS>coordinatedisplay.js</deegree:ModuleJS>
<deegree:ParameterList>
<deegree:Parameter>
<deegree:Name>digits</deegree:Name>
<deegree:Value>3</deegree:Value>
</deegree:Parameter>
<deegree:Parameter>
<deegree:Name>labelX</deegree:Name>
<deegree:Value>'lon:'</deegree:Value>
</deegree:Parameter>
<deegree:Parameter>
<deegree:Name>labelY</deegree:Name>
<deegree:Value>'lat:'</deegree:Value>
</deegree:Parameter>
</deegree:ParameterList>
</deegree:Module>
<deegree:Module hidden="false" type="content" width="685" height="20">
<deegree:Name>MenuBarBottom</deegree:Name>
<deegree:Content>menubarbottom.html</deegree:Content>
<deegree:ModuleJS>menubar.js</deegree:ModuleJS>
</deegree:Module>
</deegree:South>
<!-- WEST -->
<deegree:West hidden="false">
<deegree:Module hidden="false" type="content" width="150" height="150"
scrolling="no">
<deegree:Name>MapOverview</deegree:Name>
<deegree:Content>mapoverview.html</deegree:Content>
<deegree:ModuleJS>mapoverview.js</deegree:ModuleJS>
<deegree:ModuleJS>wz_jsgraphics_box.js</deegree:ModuleJS>
<deegree:ParameterList>
<deegree:Parameter>
<deegree:Name>src</deegree:Name>
<deegree:Value>'./images/overview_utah.gif'</deegree:Value>
</deegree:Parameter>
<deegree:Parameter>
<deegree:Name>minx</deegree:Name>
<deegree:Value>161923</deegree:Value>
</deegree:Parameter>
<deegree:Parameter>
<deegree:Name>miny</deegree:Name>
<deegree:Value>4094621</deegree:Value>
</deegree:Parameter>
<deegree:Parameter>
<deegree:Name>maxx</deegree:Name>
<deegree:Value>725119</deegree:Value>
</deegree:Parameter>
<deegree:Parameter>
<deegree:Name>maxy</deegree:Name>
<deegree:Value>4657817</deegree:Value>
</deegree:Parameter>
<deegree:Parameter>
<deegree:Name>foregroundColor</deegree:Name>
<deegree:Value>'#ff0000'</deegree:Value>
</deegree:Parameter>
<deegree:Parameter>
<deegree:Name>width</deegree:Name>
<deegree:Value>150</deegree:Value>
</deegree:Parameter>
<deegree:Parameter>
<deegree:Name>height</deegree:Name>
<deegree:Value>150</deegree:Value>
</deegree:Parameter>
</deegree:ParameterList>
</deegree:Module>
<deegree:Module hidden="false" type="content" width="150" height="50">
<deegree:Name>ScaleSwitcher</deegree:Name>
<deegree:Content>scaleswitcher.html</deegree:Content>
<deegree:ModuleJS>scaleswitcher.js</deegree:ModuleJS>
<deegree:ParameterList>
<deegree:Parameter>
<deegree:Name>label</deegree:Name>
<deegree:Value>'Scale:'</deegree:Value>
</deegree:Parameter>
<deegree:Parameter>
<deegree:Name>listOfScales</deegree:Name>
<deegree:Value>'1:25000;1:50000;1:100000;1:500000;1:1000000;1:5000000'</deegree:Value>
</deegree:Parameter>
<deegree:Parameter>
<deegree:Name>listSize</deegree:Name>
<deegree:Value>1</deegree:Value>
</deegree:Parameter>
<deegree:Parameter>
<deegree:Name>bgcolor</deegree:Name>
<deegree:Value>'#cccccc'</deegree:Value>
</deegree:Parameter>
</deegree:ParameterList>
</deegree:Module>
<!-- CSW Client Module -->
<!-- BEWARE: this module is not working yet !!! -->
<deegree:Module hidden="false" type="content" height="0" width="0" scrolling="no">
<deegree:Name>CswModule</deegree:Name>
<deegree:Content>modules/csw/cswmodule.html</deegree:Content>
<deegree:ModuleJS>modules/csw/cswmodule.js</deegree:ModuleJS>
<deegree:ParameterList>
<deegree:Parameter>
<!-- only this parameter is optional. default is 10. -->
<deegree:Name>maxRecords</deegree:Name>
<deegree:Value>10</deegree:Value>
</deegree:Parameter>
<deegree:Parameter>
<deegree:Name>Profiles.ISO19115</deegree:Name>
<deegree:Value>'brief|csw/metaList2html.xsl;full|csw/metaContent2html.xsl'</deegree:Value>
</deegree:Parameter>
<!-- deegree:Parameter>
<deegree:Name>Profiles.OGCCORE</deegree:Name>
<deegree:Value>'brief|metaList2html.xsl;summary|metaOverview2html.xsl;full|metaDetails2html.xsl'</deegree:Value>
</deegree:Parameter -->
<deegree:Parameter>
<deegree:Name>Catalogues</deegree:Name>
<!-- <deegree:Value>'CATA1|http://localhost:8085/deegree/services;TEST|http://localhost:8085/deegree/test/catalogue'</deegree:Value> -->
<deegree:Value>'CATA1|http://localhost:8085/deegree/services'</deegree:Value>
</deegree:Parameter>
<deegree:Parameter>
<deegree:Name>Protocols</deegree:Name>
<!-- <deegree:Value>'CATA1|POST;TEST|POST'</deegree:Value> -->
<deegree:Value>'CATA1|POST'</deegree:Value>
</deegree:Parameter>
<deegree:Parameter>
<deegree:Name>Formats</deegree:Name>
<!-- <deegree:Value>'CATA1|ISO19115;TEST|ISO19119'</deegree:Value> -->
<deegree:Value>'CATA1|ISO19115,ISO19119'</deegree:Value>
</deegree:Parameter>
<deegree:Parameter>
<deegree:Name>mapContextTemplate</deegree:Name>
<deegree:Value>'WEB-INF/conf/igeoportal/users/mapContextTemplate.xml'</deegree:Value>
</deegree:Parameter>
<deegree:Parameter>
<deegree:Name>namespaceBindings</deegree:Name>
<deegree:Value>'xmlns:csw=http://www.opengis.net/cat/csw;xmlns:iso19115=http://schemas.opengis.net/iso19115full;xmlns:iso19115brief=http://schemas.opengis.net/iso19115brief;xmlns:iso19119=http://schemas.opengis.net/iso19119;xmlns:smXML=http://metadata.dgiwg.org/smXML'</deegree:Value>
</deegree:Parameter>
<!-- The parameter value to be specified is represented by [this part only] in the following line: /csw:GetRecordsResponse/csw:SearchResults/[MetadataElement]/[this part only] -->
<deegree:Parameter>
<deegree:Name>XPathToDataId</deegree:Name>
<deegree:Value>'fileIdentifier/smXML:CharacterString'</deegree:Value>
</deegree:Parameter>
<deegree:Parameter>
<deegree:Name>XPathToDataTitle</deegree:Name>
<deegree:Value>'identificationInfo/iso19115brief:MD_DataIdentification/title/smXML:CharacterString'</deegree:Value>
</deegree:Parameter>
<deegree:Parameter>
<deegree:Name>XPathToDataTitleFull</deegree:Name>
<deegree:Value>'iso19115:identificationInfo/smXML:MD_DataIdentification/smXML:citation/smXML:CI_Citation/smXML:title/smXML:CharacterString'</deegree:Value>
</deegree:Parameter>
<deegree:Parameter>
<deegree:Name>XPathToServiceId</deegree:Name>
<deegree:Value>'smXML:fileIdentifier/smXML:CharacterString'</deegree:Value>
</deegree:Parameter>
<deegree:Parameter>
<deegree:Name>XPathToServiceTitle</deegree:Name>
<deegree:Value>'smXML:identificationInfo/iso19119:CSW_ServiceIdentification/smXML:citation/smXML:CI_Citation/smXML:title/smXML:CharacterString'</deegree:Value>
</deegree:Parameter>
<deegree:Parameter>
<deegree:Name>XPathToServiceOperatesOnTitle</deegree:Name>
<deegree:Value>'smXML:identificationInfo/iso19119:CSW_ServiceIdentification/iso19119:operatesOn/smXML:MD_DataIdentification/smXML:citation/smXML:CI_Citation/smXML:title/smXML:CharacterString'</deegree:Value>
</deegree:Parameter>
<deegree:Parameter>
<deegree:Name>XPathToServiceAddress</deegree:Name>
<deegree:Value>'smXML:identificationInfo/iso19119:CSW_ServiceIdentification/iso19119:operationMetadata[iso19119:SV_OperationMetadata/iso19119:operationName/smXML:CharacterString="GetCapabilities"]/iso19119:SV_OperationMetadata/iso19119:connectPoint/smXML:CI_OnlineResource/smXML:linkage/smXML:URL'</deegree:Value>
</deegree:Parameter>
<deegree:Parameter>
<deegree:Name>XPathToServiceType</deegree:Name>
<deegree:Value>'smXML:identificationInfo/iso19119:CSW_ServiceIdentification/iso19119:serviceType/smXML:CharacterString'</deegree:Value>
</deegree:Parameter>
<deegree:Parameter>
<deegree:Name>XPathToServiceTypeVersion</deegree:Name>
<deegree:Value>'smXML:identificationInfo/iso19119:CSW_ServiceIdentification/iso19119:serviceTypeVersion/smXML:CharacterString'</deegree:Value>
</deegree:Parameter>
</deegree:ParameterList>
</deegree:Module>
<deegree:Module hidden="false" type="content" height="210">
<deegree:Name>Spacer</deegree:Name>
<deegree:Content>spacer.html</deegree:Content>
</deegree:Module>
<deegree:Module hidden="false" type="content" width="180" height="180">
<deegree:Name>Note</deegree:Name>
<deegree:Content>note.html</deegree:Content>
<deegree:ModuleJS>dummy.js</deegree:ModuleJS>
</deegree:Module>
</deegree:West>
<!-- CENTER -->
<deegree:Center hidden="false">
<deegree:Module hidden="false" type="toolbar" width="450" height="35">
<deegree:Name>Toolbar</deegree:Name>
<deegree:Content>toolbar.html</deegree:Content>
<deegree:ModuleJS>toolbar.js</deegree:ModuleJS>
<deegree:ModuleJS>buttongroup.js</deegree:ModuleJS>
<deegree:ParameterList>
<deegree:Parameter>
<deegree:Name>refresh|refresh map</deegree:Name>
<deegree:Value>PushButton</deegree:Value>
</deegree:Parameter>
<deegree:Parameter>
<deegree:Name>fullextent|zoom to full extent</deegree:Name>
<deegree:Value>PushButton</deegree:Value>
</deegree:Parameter>
<deegree:Parameter>
<deegree:Name>movetoprevious|move to previous map</deegree:Name>
<deegree:Value>PushButton</deegree:Value>
</deegree:Parameter>
<deegree:Parameter>
<deegree:Name>movetonext|next to previous map</deegree:Name>
<deegree:Value>PushButton</deegree:Value>
</deegree:Parameter>
<deegree:Parameter>
<deegree:Name>zoomin|zoomin by mouse click or mouse drag</deegree:Name>
<deegree:Value>ToggleButton</deegree:Value>
</deegree:Parameter>
<deegree:Parameter>
<deegree:Name>zoomout|zoomout by mouse click</deegree:Name>
<deegree:Value>ToggleButton</deegree:Value>
</deegree:Parameter>
<deegree:Parameter>
<deegree:Name>featureinfo|get info to a object within the map</deegree:Name>
<deegree:Value>ToggleButton</deegree:Value>
</deegree:Parameter>
<deegree:Parameter>
<deegree:Name>recenter|recenter the map by mouse click</deegree:Name>
<deegree:Value>ToggleButton</deegree:Value>
</deegree:Parameter>
<deegree:Parameter>
<deegree:Name>move|drag the map by mouse with pressed mouse button</deegree:Name>
<deegree:Value>ToggleButton</deegree:Value>
</deegree:Parameter>
<deegree:Parameter>
<deegree:Name>addwms|add additonal WMS to the map</deegree:Name>
<deegree:Value>PushButton</deegree:Value>
</deegree:Parameter>
<deegree:Parameter>
<deegree:Name>print|generate print view</deegree:Name>
<deegree:Value>PushButton</deegree:Value>
</deegree:Parameter>
<deegree:Parameter>
<deegree:Name>bgcolor</deegree:Name>
<deegree:Value>'#E9E9E9'</deegree:Value>
</deegree:Parameter>
</deegree:ParameterList>
</deegree:Module>
<deegree:Module hidden="false" type="content" width="550" height="550"
scrolling="no">
<deegree:Name>MapView</deegree:Name>
<deegree:Content>mapview.html</deegree:Content>
<deegree:ModuleJS>mapview.js</deegree:ModuleJS>
<deegree:ModuleJS>mapcontroller.js</deegree:ModuleJS>
<deegree:ModuleJS>mapmodel.js</deegree:ModuleJS>
<deegree:ModuleJS>wmsrequestfactory.js</deegree:ModuleJS>
<deegree:ModuleJS>wmslayer.js</deegree:ModuleJS>
<deegree:ParameterList>
<deegree:Parameter>
<deegree:Name>model</deegree:Name>
<deegree:Value>this.mapModel</deegree:Value>
</deegree:Parameter>
<deegree:Parameter>
<deegree:Name>border</deegree:Name>
<deegree:Value>0</deegree:Value>
</deegree:Parameter>
</deegree:ParameterList>
</deegree:Module>
</deegree:Center>
</deegree:Frontend>
<deegree:MapParameter>
<deegree:OfferedInfoFormats>
<deegree:Format>application/vnd.ogc.gml</deegree:Format>
<deegree:Format selected="true">text/html</deegree:Format>
</deegree:OfferedInfoFormats>
<deegree:OfferedZoomFactor>
<deegree:Factor selected="true">25</deegree:Factor>
</deegree:OfferedZoomFactor>
<deegree:OfferedPanFactor>
<deegree:Factor selected="true">15</deegree:Factor>
</deegree:OfferedPanFactor>
<deegree:MinScale>1</deegree:MinScale>
<deegree:MaxScale>100000</deegree:MaxScale>
</deegree:MapParameter>
</Extension>
</General>
<LayerList>
<Layer queryable="1" hidden="0">
<Server service="OGC:WMS" version="1.1.1" title="deegree2.2 Demo WMS">
<OnlineResource xlink:type="simple"
xlink:href="http://localhost:8080/deegree-wms/services?" />
</Server>
<Name>Lake</Name>
<Title>Lakes</Title>
<SRS>EPSG:26912</SRS>
<FormatList>
<Format current="1">image/png</Format>
</FormatList>
<StyleList>
<Style current="1">
<Name>default</Name>
<Title>default</Title>
</Style>
</StyleList>
<Extension xmlns:deegree="http://www.deegree.org/context">
<deegree:MasterLayer>false</deegree:MasterLayer>
</Extension>
</Layer>
<Layer queryable="1" hidden="0">
<Server service="OGC:WMS" version="1.1.1" title="deegree2.2 Demo WMS">
<OnlineResource xlink:type="simple"
xlink:href="http://localhost:8080/deegree-wms/services?" />
</Server>
<Name>Municipalities</Name>
<Title>Municipalities</Title>
<SRS>EPSG:26912</SRS>
<FormatList>
<Format current="1">image/png</Format>
</FormatList>
<StyleList>
<Style current="1">
<Name>default</Name>
<Title>default</Title>
</Style>
</StyleList>
<Extension xmlns:deegree="http://www.deegree.org/context">
<deegree:MasterLayer>false</deegree:MasterLayer>
</Extension>
</Layer>
<Layer queryable="1" hidden="1">
<Server service="OGC:WMS" version="1.1.1" title="deegree2.2 Demo WMS">
<OnlineResource xlink:type="simple"
xlink:href="http://localhost:8080/deegree-wms/services?" />
</Server>
<Name>Counties</Name>
<Title>County Boundary</Title>
<SRS>EPSG:26912</SRS>
<FormatList>
<Format current="1">image/png</Format>
</FormatList>
<StyleList>
<Style current="1">
<Name>default</Name>
<Title>default</Title>
</Style>
</StyleList>
<Extension xmlns:deegree="http://www.deegree.org/context">
<deegree:MasterLayer>false</deegree:MasterLayer>
</Extension>
</Layer>
<Layer queryable="1" hidden="1">
<Server service="OGC:WMS" version="1.1.1" title="deegree2.2 Demo WMS">
<OnlineResource xlink:type="simple"
xlink:href="http://localhost:8080/deegree-wms/services?" />
</Server>
<Name>StateBoundary</Name>
<Title>State Boundary</Title>
<SRS>EPSG:26912</SRS>
<FormatList>
<Format current="1">image/png</Format>
</FormatList>
<StyleList>
<Style current="1">
<Name>default</Name>
<Title>default</Title>
</Style>
</StyleList>
<Extension xmlns:deegree="http://www.deegree.org/context">
<deegree:MasterLayer>false</deegree:MasterLayer>
</Extension>
</Layer>
<Layer queryable="1" hidden="1">
<Server service="OGC:WMS" version="1.1.1" title="deegree2.2 Demo WMS">
<OnlineResource xlink:type="simple"
xlink:href="http://localhost:8080/deegree-wms/services?" />
</Server>
<Name>StateOverview</Name>
<Title>State Overview</Title>
<SRS>EPSG:26912</SRS>
<FormatList>
<Format current="1">image/png</Format>
</FormatList>
<StyleList>
<Style current="1">
<Name>default</Name>
<Title>default</Title>
</Style>
</StyleList>
<Extension xmlns:deegree="http://www.deegree.org/context">
<deegree:MasterLayer>false</deegree:MasterLayer>
</Extension>
</Layer>
<Layer queryable="1" hidden="0">
<Server service="OGC:WMS" version="1.1.1" title="deegree2.2 Demo WMS">
<OnlineResource xlink:type="simple"
xlink:href="http://localhost:8080/deegree-wms/services?" />
</Server>
<Name>ZipCodes</Name>
<Title>ZipCodes</Title>
<SRS>EPSG:26912</SRS>
<FormatList>
<Format current="1">image/png</Format>
</FormatList>
<StyleList>
<Style current="1">
<Name>default</Name>
<Title>default</Title>
</Style>
</StyleList>
<Extension xmlns:deegree="http://www.deegree.org/context">
<deegree:MasterLayer>false</deegree:MasterLayer>
</Extension>
</Layer>
<Layer queryable="1" hidden="1">
<Server service="OGC:WMS" version="1.1.1" title="deegree2.2 Demo WMS">
<OnlineResource xlink:type="simple"
xlink:href="http://localhost:8080/deegree-wms/services?" />
</Server>
<Name>ZipCodes</Name>
<Title>ZipCodes Population</Title>
<SRS>EPSG:26912</SRS>
<FormatList>
<Format current="1">image/png</Format>
</FormatList>
<StyleList>
<Style current="1">
<Name>ZipCodesPop</Name>
<Title>ZipCodesPop</Title>
</Style>
</StyleList>
<Extension xmlns:deegree="http://www.deegree.org/context">
<deegree:MasterLayer>false</deegree:MasterLayer>
</Extension>
</Layer>
</LayerList>
</ViewContext>
$iGeoportal_home$/WEB-INF/web.xml
<?xml version="1.0" encoding="ISO-8859-1"?>
<!DOCTYPE web-app PUBLIC "-//Sun Microsystems, Inc.//DTD Web Application 2.3//EN"
"http://java.sun.com/j2ee/dtds/web-app_2.3.dtd">
<web-app>
<display-name>deegree iGeoportal standard edition v2.2</display-name>
<!--
<filter>
<filter-name>LoggingFilter</filter-name>
<filter-class>org.deegree.enterprise.servlet.LoggingFilter</filter-class>
<init-param>
<param-name>sourceAddresses</param-name>
<param-value>127.0.0.1</param-value>
</init-param>
<init-param>
<param-name>mimeTypes</param-name>
<param-value>text/xml;plain/text</param-value>
</init-param>
<init-param>
<param-name>metaInfo</param-name>
<param-value>true</param-value>
</init-param>
</filter>
<filter-mapping>
<filter-name>LoggingFilter</filter-name>
<url-pattern>/*</url-pattern>
</filter-mapping>
-->
<servlet>
<servlet-name>RequestHandler</servlet-name>
<servlet-class>org.deegree.portal.standard.PortalRequestDispatcher</servlet-class>
<init-param>
<param-name>Handler.configFile</param-name>
<param-value>WEB-INF/conf/igeoportal/controller.xml</param-value>
</init-param>
<init-param>
<param-name>MapContext.configFile</param-name>
<param-value>WEB-INF/conf/igeoportal/wmc_start_utah.xml</param-value>
</init-param>
</servlet>
<servlet>
<servlet-name>PrintAccess</servlet-name>
<servlet-class>org.deegree.enterprise.servlet.DirectoryAccessServlet</servlet-class>
<init-param>
<param-name>ROOTDIR</param-name>
<param-value>./print/</param-value>
</init-param>
<load-on-startup>1</load-on-startup>
</servlet>
<servlet-mapping>
<servlet-name>RequestHandler</servlet-name>
<url-pattern>/control</url-pattern>
</servlet-mapping>
<servlet-mapping>
<servlet-name>PrintAccess</servlet-name>
<url-pattern>/print</url-pattern>
</servlet-mapping>
<welcome-file-list>
<welcome-file>welcome.html</welcome-file>
</welcome-file-list>
</web-app>
1For oncoming versions of iGeoPortal, you can use this information for user defined styles and layer, described by Styled Layer Descriptors (SLD).